Developing a high-converting landing page requires a lot of work, but is one of the best ways to see a positive ROI on your marketing campaigns. If you are running any campaigns with a landing page and haven’t run a test, you are leaving money on the table. By the end of this training, you’ll know how to run a split test on your landing pages and discover what’s actually working and what you need to fix to drive more ROI.

How to Optimize and Create High-Converting Landing Page for Marketing Campaigns
What You’ll Learn:
- Get the strategy and skills to test your landing page and understand its strengths and weaknesses so you can create a high-converting landing page
Table of Contents
Table of contents
Understand the Purpose of Landing Page Testing
What is Optimization All About?
Know How and What to Test
Know What A Great Test Entails
Should You Even Test Your Page?
Offer vs. Structure Test
Will Your Test Make a Difference?
Can Your Test Can Be Implemented?
Does the Test Align with Your KPI Goals?
Think Through Your Hypothesis
Prioritize Your Tests
Test These Elements If You’re Not Sure Where to Start
Different Elements You Can Test
Test Your CTA
Test Your Headline
Test Your Images
Test Your Trust Indicators
Test Your Copy
Test Your Videos
Set Up Your Test
Decide on a Testing Software
Remember This When Setting Up Tests
You’ve Run a Test, Now What?
Compile Your Results
Understand the Purpose of Landing Page Testing
What is Optimization All About?
The goal of any landing page is to convert prospects. Effective landing pages convert well because they are congruent. The content of the landing page matches the content of the ad that brought the customer to the page.
But if you have a poor-performing landing page, it’s difficult to nail down where the disconnect lies. With so many elements to test, it may seem overwhelming to figure out how to optimize your pages (much less where to start).
Great landing page optimization starts with asking the right questions and setting up experiments in a methodical way.
In this article, we’ll go over the anatomy of a great landing page test, and how you can build your own tests to help optimize your landing pages to convert more prospects.
Know How and What to Test
Know What A Great Test Entails
Before we just jump into testing and optimization, we need to stress one important statement. Not all tests are created equal!
You need to make sure that the landing page tests you are running are good quality tests.
There are six considerations to keep in mind when selecting and qualifying your tests.
- Should you even test your page?
- What type of test are you running?
- How much of a difference will your test make?
- Can you implement the tested changes to your landing page?
- Does the test line up with your KPI’s?
- What is your hypothesis?
Let’s review each of these considerations, and then determine the order in which you want to run your different tests.
Should You Even Test Your Page?
Before we just jump into testing and optimization, we need to stress one important statement. Not all test are created equal!
You need to make sure that the landing page tests you are running are good quality tests.
There are six considerations to keep in mind when selecting and qualifying your tests.
- Should you even test your page?
- What type of test are you running?
- How much of a difference will your test make?
- Can you implement the tested changes to your landing page?
- Does the test line up with your KPI’s?
- What is your hypothesis?
Let’s review each of these considerations, and then determine the order in which you want to run your different tests.

Let’s review each of these considerations, and then determine the order in which you want to run your different tests.
The form is awkward, has fill in criteria below the fold, and next to the “Submit” button is a “reset” button.
Should he test? No! Make the necessary changes on this broken page and test something worthwhile! There is a clear way to proceed, simply fix the form and move on.
Numbers are also crucial when deciding whether to test. If you don’t get enough traffic, you won’t be able to run a conclusive split test.
If you can’t get at least 100 converting actions on each variation, don’t bother running the test. If you do run the test, be very careful with the data because it is probably wrong.
You can still optimize your low traffic site and use other verification methods including:
- Qualitative insights: Insights gathered from non-analytical sources such as heatmaps, user surveys, or personas.
- Persona construction: A semi-fictional character depicting your ideal customer, in general you create several to account for different customer types.
- Real time personalization: A type of user segmentation that dynamically inserts or provides specific content for that user segment.
- Sequential Testing: A type of test comparing the results from two distinct dates. This method is often frowned upon but is a good way for traffic challenged sites to get an idea about what’s working. Use sparingly if at all.
- Split tests using micro conversions as indicators: Micro conversions are higher level conversions, such as clicks, on higher funnel pages, e.g., homepage. They are used as indicators when you run a test that doesn’t have enough deep funnel conversion data. For example: if you are an ecommerce site with low traffic, you cannot run a test on your homepage and measure these changes at the sales level. When testing, you can look at these higher-level conversions as an indication of success.
Offer vs. Structure Test
The first step to running a test is to decide whether you are testing your offer or the page structure.
Offer Tests focus on optimizing the offer you are giving and how it is portrayed to the prospect. Some questions you may ask about your offer could include:
- Are you providing a checklist or a video?
- If they are purchasing something, is the price a fair representation of the product/service offered?
- Is your offer clearly explained?
- If you’re offering a product, is the product shown?
You should never assume that the offer is good just because that’s the offer you’ve always used. No number of structural tweaks can make a bad offer convert!
Structural Tests focus on optimizing the anatomy of the landing page.
These types of tests experiment with things like:
- new copy,
- images,
- page layouts
We’ll discuss more of these elements in detail later.
Best practice is to make sure you optimize your offer before anything else.
ACTION ITEM: Decide if you want to run an offer test or a structural test.
Will Your Test Make a Difference?
Consider the probability that the test you will run will provide a dramatic increase in the desired behavior (opt-ins, purchases, clicks, etc.)
Tests with a high lift percentage (the percent difference you think your test will have on your results) require a smaller sample size. So, on top of having a great immediate impact on your conversions, tests with a high lift potential can also be completed faster than tests with smaller gains.
Can Your Test Can Be Implemented?
There are 2 major considerations to keep in mind when deciding what to optimize first:
1. How hard will it be to get the test going?
Running the test requires your testing tech tool to be placed on all measured pages (not just the test page itself). Every test will require these basics:
- Code on your site
- Goal Links
- Test Assets, e.g., copy, Images, etc.…
The inability to produce or implement test assets can lead to delays in your test launch. The more complex the assets or changes to the website, the longer the test will take.
2. How hard will it be to get the winning version live?
If you run a test but will never have the ability to make the winning variation live — don’t run the test.
Most landing page tests are either smaller scale tweaks or larger radical redesigns. The former isn’t a major change for developers, but the latter is likely to require a split URL test, which is more work for you and your developer.
ACTION ITEM: Make sure you have the time and resources available to run the test, and also implement the results.
Does the Test Align with Your KPI Goals?
The more business-oriented your KPIs, the higher priority the test. Tests that focus on vanity metrics like clicks or Facebook Likes, are not going to directly impact your business goals. As marketers we love looking at all of our fun marketing metrics, but at the end of the day you are usually most concerned with 2 things: Revenue and Costs.
Higher priority KPIs are the KPIs that are directly connected to revenue and costs. These would include:
- revenue per visitor
- earnings per click
- average order value
- purchases
ACTION ITEM: Determine what KPI’s matter most to you, and if your test aligns with those KPI’s.
Think Through Your Hypothesis
A test without a hypothesis is just a guess.
You don’t want to test a new variation because ‘You think it will work’ or because ‘someone else is doing it’. You want to optimize the user experience, and the only way to do that is by looking at the data.
You need both qualitative and quantitative insights to create a solid hypothesis. Look at raw conversions, the conversion rate, and bounce rate. These numbers will let you know if there is a problem with your current landing page.
Now the fun part, looking at the qualitative data. Make sure to put your landing page in context. First, start by asking yourself these questions:
- Is there a sense of continuity from the initial ad click and the landing page?
- Do they have similar images, color scheme, and the identical offer?
If all of these things are in order there are other tools you can use to grab better qualitative insights.
Here’s a few options you can use to get more qualitative data:
- tracking tools like Crazy Egg or Hotjar to get heatmap, scroll maps, and other click reports. These reports help you learn how your customer is interacting (or possibly glancing over) elements of your site.
- surveys
- personas
- user testing
- customer service inquiries
- sales inquiries
Remember, qualitative data is absolutely crucial for hypothesis construction, so take the time to gather as much information as you can get.
ACTION ITEM: Take note of the qualitative data you need and make a plan for how you will gather the data.
Once you have enough data, you can create your hypothesis.
Every hypothesis you create needs to follow this format:
We believe that changing A for visitors B will cause C to happen.
If your test can’t be put into those terms, it is not a test you should run.
ACTION ITEM: After looking over your qualitative data, write your hypothesis.
But what if you aren’t sure what elements to look at first? Let’s go over some test elements you should consider looking into…
Prioritize Your Tests
When you are determining what tests you should run, it’s helpful to look at all the previous factors at once. This Test Priority Excel Document is a great resource to help you rank all the different tests.
ACTION ITEM: Download the resource and rank your desired landing page tests based off the different factors.
Test These Elements If You’re Not Sure Where to Start
Different Elements You Can Test
This section is about coming up with potential ideas for your next landing page test. These elements have been a major factor for conversions at DigitalMarketer, but make sure these tests work for you before you go running 50 of them (check with your qualitative data!).
Every audience is different, and while one element might work well for one website or web page, it likely may not work for another.
If you want to make sure your landing page actually converts, here are 5 elements you should look at testing:
- offer (always first!)
- call to action
- proof
- trust
- images
In this article we are going to focus on structure tests, and cover offer testing in another article. When testing these structural elements, you are trying to discover the best way to convey these elements to your customers.
Now… let’s talk test elements.
Test Your CTA
The call-to-action is one of the most important parts of your landing page. It needs to stand out and have an actionable message. The first thing you should check is that people actually see your call to action. If they don’t know where to click, they won’t click!
You’ll know that your CTA is getting attention based off the heatmap for your page. It should look something like this:

You’ll know that your CTA is getting attention based off the heatmap for your page. It should look something like this.
If your CTA isn’t getting these kinds of clicks, you need to make it more apparent. You can accomplish this a few different ways:
- Change the location of the button so that it’s in a prominent place above the fold, and also scattered throughout (if it’s a longer landing page)
- Change the color so it is more contrasting against the background
- If you’re using ghost buttons, change to regular colored buttons
If your CTA is clear and visible, your issue could be the copy. Make sure it is action-oriented and descriptive. Short and obscure CTAs won’t likely get the job done. Check out this example from ContentVerve, where the team tried to improve an already descriptive CTA:

Check out this example from ContentVerve, where the team tried to improve an already descriptive CTA.
Notice how a small tweak on this CTA saw such an impressive lift. When you make small changes on important elements, you are bound to see some conversion shifts.
Test Your Headline
Your headline can make or break your landing page! I know a lot of copywriters will like to get cutesy with their headlines but do yourself a favor – don’t!
The best headline is often simply a descriptive one that meets your visitor’s needs.
There are a few ways to gauge whether your headline is going to convert:
1) Evaluate your headline to see if it addresses these 2 crucial questions:
- What is it?
- What does it do for me?
If your headline doesn’t address both of these questions clearly and effectively, you can be sure that it is depressing your conversions.
2) Evaluate your customers quick takeaway.
Typically, when given a short timeframe to take in information, people look at the headlines and images. You can set up a Five second test to see what information viewers take away from your page, and what they remember. This will help you see if customers first impressions are in line with what you want them to take away.
Test Your Images
We’ve heard the saying “a picture is worth a thousand words”, and in the case of your landing page this couldn’t be truer! Images command a lot of attention on your landing page, so pay close attention to them.
When using imagery on landing pages, you want to make sure your images do the following:
- showcase your product/service in a clear, understandable way.
- Over-exaggerate your product/service (or you could be hit with some pretty harsh compliance issues from paid traffic providers).
- compliments the page copy and layout, rather than overpower everything. It’s easy for images to cause visual confusion and actually distract people from converting.
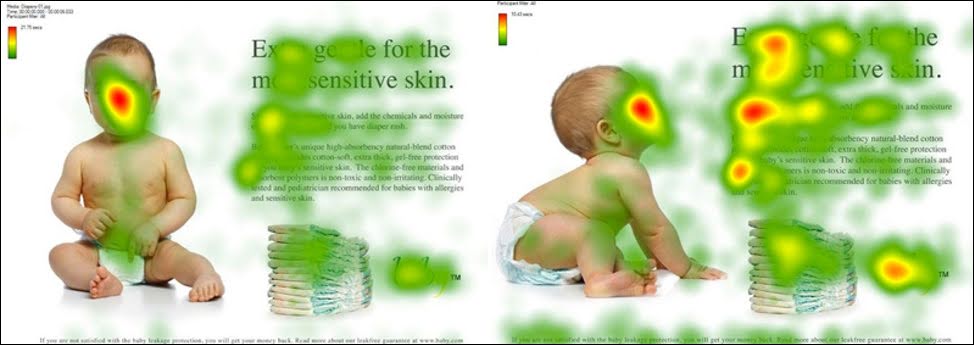
Notice how changing the image of the baby to have it face the copy increases views of that copy? This is because people tend to look where others are looking (even if it is an image and not a real person).
Notice how changing the image of the baby to have it face the copy increases views of that copy? This is because people tend to look where others are looking (even if it is an image and not a real person).
If you think your image is hurting conversions, ask these 3 questions:
- Am I using stock photos?
- Does my image break the eye flow?
- Does my image break the visual consistency from ad to landing page? (Learn more about this here)
If you say yes to any of these questions, an image test is in your future!
Test Your Trust Indicators
If you want action on your landing page, your site visitors need to trust you! One of the best ways to develop trust is by using multiple forms of trust indicators.
Trust indicators include:
Privacy Policies: The privacy policy is absolutely crucial for your landing page. On top of building trust with your prospects, a privacy policy is also a necessary addition for Google (and other paid traffic sources) compliance.
Security Seals: Security seals are another trust indicator that can help increase conversions. When selecting security seals, ensure that you are using seals people recognize and are appropriate to the situation.
Guarantees: Money back guarantees, shipping guarantees, etc. are helpful to include so long as they align with what the CTA is.
Testimonials: Testimonials matter because people want to know other people have used this product/service and have had success. Using one or 2 testimonials will help
When you use testimonials on your landing pages use the following:
- A picture of the person giving the testimonial
- A brief quote
- The name, company, and title
Consider testing some different trust elements on your page.
Test Your Copy
The copy is a crucial element on your landing page.
The amount of copy on your landing page is usually directly correlated to the price and complexity of your offer.
For lead generation landing pages (often called squeeze pages) and lower ticket items you may only need…
- headline,
- subhead,
- hero shot (image)
- bullets,
- CTA,
- trust indicator.
However, higher ticket, more complex offers will likely need more copy including More Product Images, trust indicators and guarantees.
We discussed some copy elements worth testing in previous sections, but here’s 5 copy elements to test on your landing Page:
- Headlines
- Sub Headlines
- Bullet Points
- Photo Captions
- CTAs
As a final note, if you are using longer form sales letters and prose to push your offer make your content skimmable! Write in small sentences, shorter paragraphs, and bold the key points! A “skimmer” (which is most of everyone online) won’t read big blocks of text. Keep it readable.
Test Your Videos
Videos are powerful tools to help communicate your offer quickly, effectively, and in an interesting way. Here are a few factors you can test with your videos to help improve conversions.
Video Length: video length is directly connected to the price and complexity of your offer. Longer more descriptive videos are not appropriate for lead generation or small ticket items.
Voice Actor: Test out different actors. If you have the resources to get a professional voice actor to narrate your video, make sure to get a diverse group of actors to test from. Things like accents, gender, mannerisms, and more can all have an effect on how well your audience relates to the actor, and thus how well they connect with the offer.
CTA Delay: Sometimes you want your visitor to actually listen to what you’re saying and not distract them with your call to action right away. If you are going to try out CTA delays, make sure that your video gives audio cues to the prospect.
Adding in ‘Click that button below’ and having it appear at that moment is a tactic we use here at DM and it has worked well for us.
No call to action is displayed (image left) until the sales arguments have been made — at which point the buy button is “popped” (image right.)

No call to action is displayed (image left) until the sales arguments have been made — at which point the buy button is “popped” (image right.)
Remember, just because this tactic has worked well for us doesn’t mean it will for you. Your visitors might be impatient and want to click through right away. Test this!
Auto-Play vs. Click to Play: This is another great test that will likely be impacted by your audience. Corporate B2B audiences tend to bounce on auto-play videos, but a consumer audience will actually see a conversion boost. This is an easy test to set up with your video player, and very worthwhile.
Set Up Your Test
Decide on a Testing Software
At this point, you should have a good idea what test you want to run. Now it’s time to set up your test inside your testing software. This process will look different depending on which software you have. Here are some different testing software’s you could try out:
- VWO (This is the software we use at DM)
- Optimizely
- AB Tasty
ACTION ITEM: Decide what testing software would work best for you.
Remember This When Setting Up Tests
Every test needs a starting point and a stopping point. If you start a test with no clear end in sight or an end that is months away, you’re doing it wrong! This is why low traffic sites really can’t run a true split test, they just don’t have the traffic to get usable data in a reasonable timeframe.
What’s a reasonable time frame? I generally say no more than a 6 month period (and that’s stretching it). Ideally, you’d like to cover at least one business (two is optimal) cycle before calling a test. For consumer brands a business cycle is around 7 days.
We Recommend you schedule your testes in advanced. This helps for 2 reasons:
- It makes sure you don’t call a test too soon. Testing techs (like Visual Website Optimizer or VWO) love to tell us something is statistically significant even though the test has only run for a few hours or days. Since 25% of marketers report that they call a test as soon as the tech indicates, simply scheduling a test would immediately remedy this bad testing practice.
- It will help your testing activities since you’ll know whether you can actually run a test then! If you can’t get enough data within 6 weeks, you might want to find another page to test on.
When scheduling a test there are a few major factors that will impact test timing:
Number of Conversions
If you aren’t getting between 100-200 converting actions per each variation, your test won’t provide incredibly useful data. If you think this is high, it is for a reason, you need a large enough data set to make business decisions.
If you pull from a small data set there is a higher chance for error, specifically a false positive. A false positive is when you report a change when there actually isn’t one.
If you do not get at least 100 conversions per variation, but still want to test – tread lightly!
Number of Variations
If you have low traffic, don’t run multiple variations. For every variation you add, your traffic need grows exponentially!
It is important to keep your test simple at the beginning, get familiar with the practice, and then go for more complex tests (if you have the traffic).
Confidence Level
The confidence level tells you whether the change you are seeing is happening due to the changes you made or other variant noise. In other words, the confidence level tells you at what percentage you can be sure there was an actual change.
95% confidence is the industry standard. This means that there is a 5% chance the reported change is actually due to randomness. The industry is comfortable with this 5% threshold, which actually means that 1/20 tests are due to randomness. If you see a test result that is too good (or bad) to be true, there is a chance it actually is, and you need to retest.
The higher your confidence level, the more data you need. Conversely the lower the confidence, the less data you need. If you are traffic-challenged, you could go for a lower confidence rate, say 90%. If you do this be sure to note that the test results are a higher risk.
Amount Of Traffic
Where conversions dictate the length of your test and traffic dictates the number of conversions, it just stands to reason that traffic is a factor. Your traffic will help you estimate just how many days you need to run your test.
Lift Percentage
The actual lift between each variation will also dictate the amount of time it takes to run a test. I know it’s hard to estimate the expected lift and I encourage you to use industry conversion rate data as a benchmark and estimate accordingly.
Also, always use conservative estimates to ensure that you are giving your test enough time to gather the needed amount of data.
The lift percentage is what actually causes split testing techs to call tests earlier than they should! There is generally a lot of volatility early on in a testing period. Since the lift percentage is just so different, a testing technology might believe the test is significant despite the numbers not normalizing.
In the end, you really just need to know the basics numbers to plug into an easy-to-use testing duration calculator. I’d recommend using VWO’s duration calculator because it’s simple! Just plug in that information and look at the output.
ACTION ITEM: Use a duration calculator to determine your test length.
When you get this output, you have one final step Round up the number of days to complete the week. If your calculator says it will take 9 days to get the data, round up to 14. Your optimization calendar and test data will thank you!
ACTION ITEM: When you have your timeline – toss it into your calendar and run that test!
In the details of this calendar event put the…
- URL
- measured metrics
- and hypothesis
You’ve Run a Test, Now What?
Compile Your Results
Once your test runs its course it’s time to compile your results.
We like to collect the same core information from every test we run. This information includes:
- Test name
- Page URL
- Test dates
- Metric measured
- Screenshots of your different versions
- Page results for both versions (Traffic, Conversions, Conversion Rate, Relative Lift)
- An analysis summary
- Any other observations
- Next Steps
This information should be documented for every test you run, regardless of outcome!
You next steps will depend on how your test went:
For winning tests: A Winning test will show that the metrics increased at a statistically significant amount for the test page. Your usual next step is to make the changes you tested live. You also may want to run follow up tests for anything you noted in the “Other Observations” section.
For failed tests: A failed test will show that the control page (the one with no change) has higher, statistically significant increases in the metrics tracked. In this case, you may not want to put the changes you tested live, but you still might have follow-up tests to run based off information you learned from this test. Failed tests are still incredibly helpful in gathering information about your page’s performance.
For flatlined tests: A flatlined test will have no statistically significant results to show. You’ll know it’s time to pull this test when your data starts to flatline out for all the metrics your tracking. When this happens, your best bet is to stop the test, so you aren’t wasting time and possibly money on the test.
And with that, you are ready to start running your own landing page split tests!