Everyone knows that Google Analytics(GA) is a necessary, and business-changing tool. However, just the word “analytics” is often enough to send any marketer running in the opposite direction. This article is an easy-to-follow guide to getting started with Google Analytics. You’ll learn how to set up your account, implement goal tracking, and use a simple tool to tag the traffic that’s important to you. You’ll also learn about the 5 reporting suites inside GA, and identify the reports that matter to your business. By the time you’re done, you are way more confident in your ability to navigate and reap the benefits of Google Analytics.

Startup Guide for Google Analytics
What You’ll Learn:
- Set up your Google Analytics account
- Identify what reports you should be using to gain insights from your data
- Understand the basics of google analytics, including the 5 reporting suites, goal setting, and tagging your traffic
Table of Contents
Table of contents
Understand the Purpose and Role of Google Analytics
Asking Questions and Getting Answers
Get Set Up in Google Analytics
Create An Account
Create 3 Different Account Views
Prevent Tracking Internal and Bot Traffic
Label Your Traffic
Understand the Importance of Tagging Your Traffic
Start Tagging Your Traffic
Set Goals Inside Google Analytics
Define Your Goals
Set Up Goal Tracking
Navigate the Different Analytics Reports
Understand the 5 Reporting Suites
Understand the Purpose and Role of Google Analytics
Asking Questions and Getting Answers
Now, we know what you’re thinking… “Google Analytics? No thank you. I’m not a numbers person.”
It’s understandable to have some reservations when it comes to diving into Google Analytics (GA). The world of analytics can be intimidating—especially when you are staring at a screen full of numbers and percentages, with no idea what any of it means.
This article is the key to breaking down the barriers and unlocking a world of information that will truly change your business for the better.
The key to Google Analytics is all about asking the right questions and knowing where to look to get answers.
Your analytics account is filled to the brim with insights into your customers’ behaviors and interactions with your business’s digital presence. The big job is setting up your account (with all its specifications), deciding what information is important, and learning how you can use that information to better your business.
Luckily, this article will do most of the heavy lifting for you.
We will walk you through the process of…
- Setting up your analytics account
- Identifying and tagging your traffic
- And setting goals so that Analytics can track the information that’s important for your business
Let’s get to it!
Get Set Up in Google Analytics
Create An Account
Before you can dive into the reports, you need to be set up within Google Analytics.
You can create an account through Google.
Google will take you step-by-step through the process of setting up an account. Once you finish, you should have something called a global site tag.
This tag is a piece of code that you put in the header of every page on your site, so that Google Analytics can track how customers are interacting with that page (you can learn more about where to put them here).
Want to avoid all the hassle of adding in code to all your pages? There are a ton of website plugins that will automate that process for you. At DM, we’re a fan of MonsterInsights, a WordPress plugin. You can also take advantage of Google Tag Manager to help manually add in the code if you aren’t using a WordPress site (or even if you are… It’s a pretty cool tool!).
ACTION ITEM: Create your Google Analytics account, and connect it to your website (using either site tags in your page headers or a 3rd party plugin to integrate your site).
NOTE: It may take at least 24-48 hours for you to have some data to use, but luckily, Google has a great Demo account where you can get a hang of the platform, and play around with running different reports (without the fear of breaking something).
You can access the Demo account by going to insights, and then clicking on the “Google Analytics Demo Account.”

You can access the Demo account by going to insights, and then clicking on the “Google Analytics Demo Account.”
Create 3 Different Account Views
Your account view is the lens through which you view your data. You will want to create a few different views.
We suggest 3:
- The unfiltered view
- The maser view
- The test view
Each data view serves a specific purpose. Let’s go over them quickly.
The Unfiltered View: This is the view that holds all your raw, unfiltered data. Since we will be adding a few filters on other views, it’s an important best practice to have a raw version of all your data. That way, if you run into any issues while adding filters, you don’t screw up your only copy of your data.
The Test View: Let’s say you want to try and play around with a new setting or view. You don’t want to lose all the current settings, and you definitely don’t want to ruin the raw data. That’s what the test view is for! Try out all your tests here, and once you have decided it works the way you want, you can add the settings to your master view.
The Master View: You will live in this view most of the time. This is the view where you set previously tested filters and analyze your data. Essentially, this is the data you trust to be most accurate to what you are wanting to pull from.
ACTION ITEM: Follow these steps to set up the 3 views on your account:
The first step is to navigate to the Admin section.

The first step is to navigate to the Admin section.
Next, you’ll want to click on “Create View” on the right-hand side, above the view menu.

Next, you’ll want to click on “Create View” on the right-hand side, above the view menu.
Once there, you’ll create your first view by naming it, setting a time zone, and pressing “Create View.”

Once there, you’ll create your first view by naming it, setting a time zone, and pressing “Create View.”
Repeat this process until you have a total of 4 views, the 3 mentioned above (Unfiltered, Test, Master), and the original view set by Google (All Web Site Data).
Great! Now you have your views set up. In the next step, we’ll show you how to make sure you aren’t tracking sessions that you, your team, or bots create.
Prevent Tracking Internal and Bot Traffic
From the moment your analytics account is set up, Google starts tracking all the activities on your website. That includes traffic created by your team and bots. Unfortunately, that’s not traffic you care about analyzing.
Luckily, there’s a way to prevent tracking these things. Let’s go ahead and set up some filters.
ACTION ITEM: Follow these steps to filter out data from bots and your own IP address:
Step 1: Go into the Admin section, and find the Filters tab. Click into Filters. *Remember* you can test out the filter in the test view If you want, but make sure you apply it to your Master View as well (just not your Raw View).

Go into the Admin section, and find the Filters tab. Click into Filters. *Remember* you can test out the filter in the test view If you want, but make sure you apply it to your Master View as well (just not your Raw View).
Step 2: Add a filter.

Add a filter.
Step 3: Name your filter and set the predefined filter set to say “Exclude,” “Traffic from the IP addresses,” “That are equal to,” and then enter your IP address.

Name your filter and set the predefined filter set to say “Exclude,” “Traffic from the IP addresses,” “That are equal to,” and then enter your IP address.
NOTE: If you work on a few different IP addresses, add them all in as filters.
As for preventing bot’s data from being tracked, it’s as simple as checking a box within the “View Settings” tab in the Admin section.

As for preventing bot’s data from being tracked, it’s as simple as checking a box within the “View Settings” tab in the Admin section.
This will prevent a good chunk of bots from being tracked. You may find that some bots will slip through the crack, in which case, you can set up custom filters. For now, the check box is a great place to start.
Label Your Traffic
Understand the Importance of Tagging Your Traffic
Google does a great job of collecting data, and they do their best to categorize where that traffic is coming from. However, they can only do so much.
It’s your job to ensure that you are tagging the traffic you want to study. Here’s why…
As you can see in this report, there is a bunch of traffic coming from a source called “Direct/None.” This source is essentially Googles’ island of misfit sources. If Google can’t identify what page a user was on that brought them to your website, it gets categorized as “Direct/None.”

If Google can’t identify what page a user was on that brought them to your website, it gets categorized as “Direct/None.”
Why is that bad? Well, look at how much revenue it is bringing in! And yet, we have no idea where those customers are coming from. That’s not a great place to be at.
There are a lot of really important sources that Google can’t track on its own… like email, for example. And if your email traffic is combined with a bunch of other random traffic sources, you can’t gain any insights from that traffic.
So, what’s the solution? Tag your traffic!
Tagging traffic that comes from outside your website is important, but make sure you aren’t tagging traffic that comes from within your website. That will create duplicate tracking and make a big mess of your data.
Let’s learn how to tag your traffic next…
Start Tagging Your Traffic
Okay, so we know it’s important that we tag our traffic, but… How do we do that?
It’s a pretty simple process. Essentially you tag your traffic by using UTMs. UTMs are snippets of code you include after your URLs that tell google how they should categorize traffic that comes from this specific URL.
You can set the following Parameters using UTMs:
Campaign Source: where this URL is. Is it on a website? Then the source is probably the website name. Is it on a Google Ad? Then the source is probably Google.
Campaign Medium: what type of traffic the URL will send. Is it a referral from a different site? Then its medium is a referral.
Campaign Name: the name of your campaign. This is basically an identifier for you. It’s used a lot when tagging traffic from ads.
Campaign Term: These are the keywords you use in the ad (used when tagging traffic from ads).
Campaign Content: another identifier you can use if you are A/B testing different ads for the same campaign/campaign terms.
These UTMs are super easy to set up, and the best part about it is that you get to categorize your traffic however you want. Google has created a tool that makes UTMs for you—thank you Google gods! All you do is input the parameters and your link and google will create a new link with your UTMs.
Now it’s your turn…
ACTION ITEM: practice setting up a UTM with the help of Google UTM Tool.
Set Goals Inside Google Analytics
Define Your Goals
No doubt, if you clicked on this Playlist, you probably have something you want to track.
Google does a great job of tracking data, but sometimes it can be difficult to find the specific information you are looking for. This is why goal setting is so important.
Maybe you have a specific sign-up call to action (CTA), and you want to know how many people have signed up. Maybe you want to know how many people have downloaded your Lead Magnet.
These are perfect examples of goals that you can set up!
NOTE: The goals you set up in your Analytics account should directly correlate to goals that drive your company. At DM, we track upsells, so we set up a goal that tracks every time someone upgrades their Lab account. We track this through different URLs that we have tagged.
Take a moment and think about your own business goals. What actions are your customers taking that affect your business the most? Think back to the Customer Value Journey; what stage in the value journey could you be focusing on, and as a result, what actions are the most important to track at that stage?
If you don’t already have set business metrics, now is a great time to get a meeting on the calendar to talk about it with your team!
ACTION ITEM: Using the “Brainstorming Goals” section on your Worksheet, jot down actions you want to track using goals, and how you plan to track it.

Using the “Brainstorming Goals” section on your Worksheet, jot down actions you want to track using goals, and how you plan to track it.
Remember that you need to decide what you’re tracking, as well as HOW Google will know that action has been completed. For example: if you want to track downloads of a Lead Magnet, you can tell google that action has been completed once someone lands on a “download complete” page.
ACTION ITEM: Once you have met with your team, done some research, and decided on the goals you want to track and how you will track them, go ahead and put them in the “Goals to Track” section of your Worksheet.
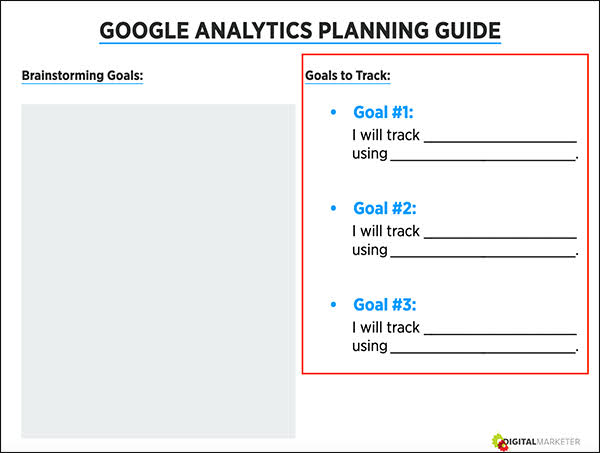
Once you have met with your team, done some research, and decided on the goals you want to track and how you will track them, go ahead and put them in the “Goals to Track” section of your Worksheet.
Set Up Goal Tracking
Now that you have decided on the goals you are going to track, it’s time to set them up inside Analytics.
You can access your goals in the Admin section under “View.”
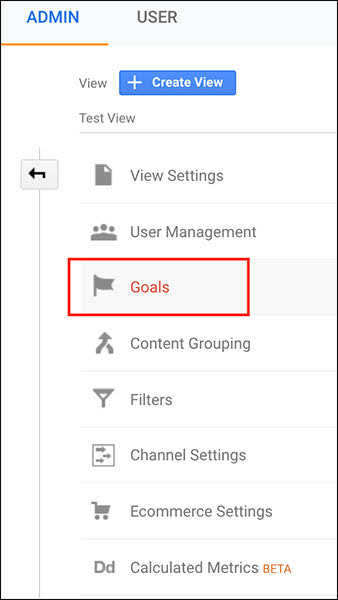
You can access your goals in the Admin section under “View.”
There are a few different pre-set goals you can use, or you can create a custom goal from scratch.

There are a few different pre-set goals you can use, or you can create a custom goal from scratch.
If you are using a template, google will auto-fill the goal type and settings for you, leaving you to fill in the URL, and that’s about it. However, if you want to set a custom goal, you will have to configure all the settings yourself.
Any goal you set will fall into 1 of 4 categories: Destination, Duration, Pages/Screens per session, or Event.

Any goal you set will fall into 1 of 4 categories: Destination, Duration, Pages/Screens per session, or Event.
Let’s quickly review these different goal types, and when you would use them.
Destination: this goal will trigger anytime someone lands on a specific URL.
You can use this goal type to track things like thank you pages (meaning someone must have made a purchase), or opt-in pages.
Duration: this goal will trigger anytime someone sits on a designated page for a specified amount of time.
You might want to use this goal type for customer support purposes or to see how long someone spends browsing before purchasing.
Pages/Screens per session: these goal types will trigger based on how many (or few) pages someone goes through during one session.
Some people use this goal type to measure how efficient their website layout is.
Events: this goal type will trigger anytime someone takes a pre-defined action that you specify beforehand. (Note: you would have to set up the event tracking with a few extra steps, but we will get to that next)
Lots of people use event goals to track things like button usage, downloads, etc.
ACTION ITEM: Go back through the goals that you wrote down on your planning guide and take note of which goal type you will need to set up in order to track that goal.
Google has a great resource to help walk you through how to set up different types of goals and also dives into setting up events that you can then track with event goals.
ACTION ITEM: Review the Google resource: Create, Edit, and Share Goals, to learn how to set up your specific goal type. Then, set up your goals!
In the next module, we will go over how you can use the google reports to help gain insights from the goals you set, and the traffic you tagged.
Understand the 5 Reporting Suites
If you remember from the beginning of this article, Google Analytics is all about asking questions and finding the right data to answer that question. Within the Analytics sidebar, you’ll notice that there are 5 different reports.
You can think of these 5 reports as the location for information on 5 different topics. Let’s break down each suite, and when you would use a report within that section…
Real-time reports answer questions about what is happening on your website right now.
Ex: you just posted a link on social media that drives people to a new opt-in page on your website. You want to see if anyone is acting on your email, so you go into the real-time and look at the Content report and see how many people are on your new opt-in page.
Audience reports answer questions you have about the characteristics of the users on your website.
Ex. You’re about to go live with a new Google Ad, but you aren’t sure what location you should be targeting the ad to. So, you go into the Audience report, under Geo, and click on Location. Now you can see a breakdown of users by country.
Acquisition reports answer questions about how your audience got to your site.
Ex. You need to find out which traffic sources produce the most revenue, so you go into Acquisitions, under All Traffic, and click on Source/Medium to look at all your traffic sources and see how much revenue each source has created.
Behavior reports answer questions about what people do once they get to your website.
Ex. You’re wanting to figure out where you have the most leverage on your site, so you go into the Behavior suite, under Site Content, and look at All Pages. This shows you which pages on your site have the highest traffic and would benefit the most from updates.
Conversions reports answer questions about if your users are taking the actions you want them to take (converting).
Ex. You want to know what path your users took to complete a goal, so you look at the Reverse Goal Path, inside the Goals section, under the Conversions Suite, and it shows you the 3 pages leading up to the goal completion location (usually a “thank you” page after they complete a purchase/sign up, etc).
There are a ton of different reports nested within each of these topics. Google will often add in new reports that they are testing and provide information about how to use them as well.
Take a second to look through the analytics suites and look into the different types of reports. While you’re looking, think back to the goals you set in the last module. How could you use these reports to help gain insights from the goals you set.
ACTION ITEM: On the second page of your Google Analytics Planning Guide, write down the names of the reports that interest you, and might help you track your goals. (Overview, Locations, Traffic Sources, etc…)

On the second page of your Google Analytics Planning Guide, write down the names of the reports that interest you, and might help you track your goals. (Overview, Locations, Traffic Sources, etc…)