Choosing an appropriate project presentation method: the milestone diagram or Gantt chart. Listing activities, identifying the continuity constraints, drawing up a logical succession of tasks, and determining the duration of activities. Calculating dates and identifying the critical path. Identifying free and total floats. Creating a Gantt chart and choosing your tracking tool.

Project Planning: How to choose appropriate project presentation method, tracking tool, calculate dates and identify critical path, free and total floats?
Objectives
By the end of this article, you will be able to:
- Manage the project time frame.
- Organize project team activity.
- Identify deadlines and correct slippage.
- Formalize, communicate and share the Schedule.
Table of Contents
Content Summary
Introduction
Transforming the initial project idea into a concrete plan
Working with the team to plan the project
Visualizing and adjusting free float in the project plan
Formalizing and communicating the project team’s commitment
Conclusion
Key Messages
Introduction
The extent to which you schedule your project will depend on two factors: the deadline constraints imposed on the project, and the percentage of your project plan that remains unknown.
In the article you are going to learn how to:
- Transform the initial project idea into a concrete plan Working as a team to plan the project
- Remove the obstacles to a detailed project schedule
- Visualize and adjust free float in the project plan
- Formalize and communicate the project team’s commitment
Matt’s problem
Matt is helping other parents in his neighborhood build a play area for the neighborhood children. Matt lives in a condominium community, and his group must first get permission from the board. At a meeting held about the playground, the board offers the use of some free space for the playground. The board backs the project, but it wants to make sure that safety is a paramount consideration in all aspects of the finished playground.
The board’s event chair wants the playground finished in a month, to coincide with a block party she’s planning for the neighborhood. Matt soon realizes that he will need not only his do-it-yourself skills, but his project management skills too.
Matt’s experience will show that whatever the environment, all projects require accurate planning and organizing tasks to specific times frames.
Transforming the initial project idea into a concrete plan
Introduction
Discover how to identify the approach by:
- Defining deadline management issues
- Choosing an appropriate method for presenting your project schedule
- Building a detailed project schedule
Identify deadline management issues
Matt invited his neighbors to a meeting to discuss the playground project. They had a lot of interesting ideas.
Mona: My nephew works for a company that makes playscape kits, with swings and slides and that sort of thing. I’d love to have one of his fancy playscapes for our kids. We could buy one of these kits and put it together ourselves.
Simon: I’d like some landscaping done in the area. I know a guy at a local nursery that could help us out with plants.
Vishruti: We’re going to have to clear out the ground the board gave us and level it, but we can do that in about four days with a group of volunteers.
David: There’s no time to wait for grass seed to grow, so I think we should find out about having the area turfed. I’ll call around and get some quotes from local companies. We could hire a company to do the work, or we could do it ourselves.
Matt: I’ll write up our plans in a letter for the neighbors. I want to get them onboard quickly.
Identifying deadline management issues
After the meeting, Matt realized that the idea had grown into something much bigger. The resulting project will require a high level of organization. Matt wasn’t sure he needed to create a formal schedule for this project. So he asked himself a series of questions:
- Is there a fixed deadline for project completion?
- Are there any other fixed time constraints?
- Are any activities dependent on others?
- Does the project involve coordinating several people?
- Is there a possibility that some activities won’t be completed on time?
- Is there a possibility that some of the building activities won’t be done correctly?
Matt can answer “yes” to all the questions. You can use these same questions to help plan your projects. The more “yeses” you have, the more likely it is you’ll need a formal schedule.
Choosing an appropriate method for presenting the schedule
The level of detail and the amount of effort you put into creating your project schedule depend on several factors.
Deadline constraints: Assess the extent of these constraints
- What projects/activities are governed by the end-of-project deadline?
- What would happen if we delivered the project two months late?
- What would happen if we delivered the project two months early?
- How would the company benefit?
Part of the unknown on the operating method is the level of risk
- How much uncertainty is there in the project?
- Do the people involved in the project already have experience with a similar project?
There are a number of different approaches to the planning process. The approach you choose will depend on deadlines and operational risks.

Project milestones and phases
Project milestones
Milestones are the decision-making points that occur at key stages of a project. At each milestone, you examine your progress and evaluate whether to continue or stop the project.
The milestones for the playground project included:
- Milestone 1: Everything is ready: Vendors are contacted and scheduled; volunteers are ready to go.
- Milestone 2: Ground is cleared and leveled.
- Milestone 3: Plyascape is finished.
- Milestone 4: Turf is put down.
- Milestone 5: Landscaping is finished.
- Milestone 6: Playground is announced to the community.
- Milestone 7: The playground is opened at the block party.
Project phases
This project plan shows the main stages with each phase.
In the playground project, there is a clear distinction between the time allowed for construction and time allowed for construction, and the time allowed for laying the turf.
Removing the obstacles to a detailed project schedule
You may meet strong objections when you decide to build a detailed project schedule. For example, Matt’s team of neighbors has some objections.
Match the neighbors’ objections with potential responses.
Creating a planning schedule is a painstaking process.
There is an efficient way to create a project schedule. Do it step-by-step, in a logical order.
I don’t have any planning tools.
While software tools can help, the most important thing is to identify the correct order in which tasks should be completed.
Project schedules are highly complex, and I am never able to update them.
A schedule can be fairly simple, if you think about times frame and task list
The demands and deadlines of my Sponsor change all the time!
A project schedule will allow you to identify areas where you have some free time.
Schedules change all the time because the people involved don’t stick to their deadlines.
Planning should leave enough slack so that people have some leeway in making their deadlines.
At work, I am given a set tasks and target dates. If I make my dates, great. If I don’t, I hear about it.
A project schedule should be shared and approved by everyone involved in the project.
Points to remember
Before you begin:
- Look carefully at time constraints, such as deadlines
- Ask yourself if everyone involved in the project shares the same vision of how to achieve the objectives. You may need to hold meetings to come to a consensus on how the objectives should be accomplished.
Key Messages
The amount of effort required to create a planning schedule will depend on two factors:
- Deadline constraints
- The level of risk
To remove obstacles to a detailed planning schedule, you need to adopt good practice:
- Employ a thorough methodology, such as the one we will learn together.
- Understand that successful planning does not always go hand-in-hand with IT software.
- Select the unit of time and list of tasks that will keep your schedule as simple as possible.
- Include provisions for risk in the timetable to avoid constantly having to move deadlines.
- Create the schedule with the other people on the project. Working together will increase their sense of ownership and motivation to respect deadlines.
Remember for future projects that the more constraints you have, the more likely it is that your project will need a project schedule, especially if you have a fixed deadline.
Working with the team to plan the project
Introduction
Building a detailed schedule involves:
- Focusing the team’s energies on producing a plan for a given project
- Identifying the activities to be scheduled, and defining the dependencies between them
- Drawing a graph showing the logical succession of tasks, the project network
- Estimating the time needed for each task
Listing the activities
Matt’s first task is to draw up a complete list of tasks involved in completing the playground project. He arranges tasks in the order in which they will be done.
Start and finish milestones
A milestone is an action or event that marks a significant change or stage in project development. Milestones provide meaningful goals for the project team to aim for. Milestones also define the project start and finish.
Matt will consider the first meeting to be the first milestone. The opening of the playground on the day of the block party will be last one.
Level of task division
Matt needs to break the playground job into tasks. A task is the smallest unit of work that he can measure and schedule. The list will enable Matt to assign time frames and responsibilities to the different tasks.
Beginning and end of each task
Matt must identify the beginning and end points for each task. He needs to estimate about how long each task takes.
Allocating responsibility
Now Matt assigns responsibilities for the tasks. He writes a volunteer’s name beside each task. Later, he will gain a firm commitment from his team members to take ownership of their assigned tasks.
Share the complete task list
Matt shares the task list with his team. Sharing and discussing the tasks helps motivate people and gives them an idea of how their participation contributes to the project. Providing a list of all tasks is a way of reassuring the team.
Tasks should be arranged in a logical way, but the chronology is not important now. It will be defined later in the process. The only important thing is not to forget any tasks.
Defining the sequencing constraints
Matt had a discussion about dependencies that exist among these tasks.
- Clear and level the land
- Choose vendors for turf and playscape kit
- Schedule delivery of turf and playscape kit
- Assemble the playscape
- Put down the turf
- Plant shrubs and flowers
Comments: There can be two logical links between tasks:
- Either the task order is chosen according to the overall project strategy. (The land is inspected and clearing begins before vendors are chosen, for example.)
- Or there are unavoidable constraints. (The turf can’t be put down until the playscape is assembled).
Engaging the project team members in the process:
Asking team members to identify the tasks that immediately follow their own tasks develops their awareness that other people depend on their work; they will need to keep to their position in the workflow and meet the deadlines they have been given.
Designing the network
Here’s a bad example of networking.

Here’s a bad example of networking.
One simple way to build a network is to use a ranking system.
Taking into account any dependencies, choose the rank you think is the most appropriate for each activity. You may have several tasks with the same rank. Once you’ve entered all the tasks, you will have a scheduling table.
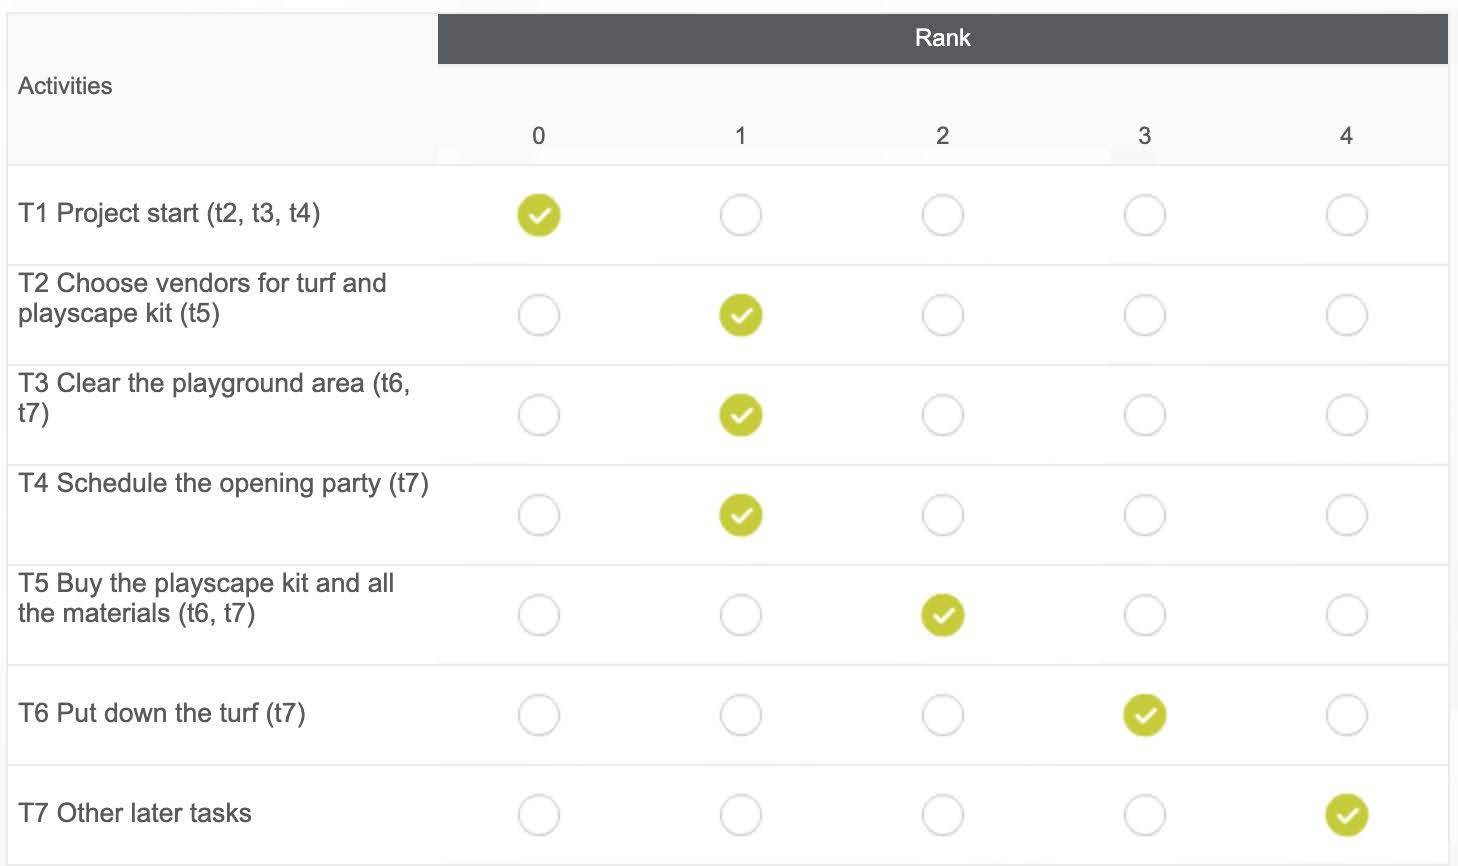
Taking into account any dependencies, choose the rank you think is the most appropriate for each activity. You may have several tasks with the same rank. Once you’ve entered all the tasks, you will have a scheduling table.
Rank 0 contains all tasks that must be done first; rank 2 all the tasks that immediately follow those in rank 1, and so on. The scheduling table contains a ‘Rank’ column listing the ranks. Tasks are placed in the adjacent columns. Tasks are then linked as shown in the scheduling table.
Here is the playground project’s scheduling table.

Here is the playground project’s scheduling table.
The ranking method gives a visual representation of the succession of tasks from the start of the project to its conclusion. This example will give you an overview of the entire process.

This example will give you an overview of the entire process.
Engaging project team members in the process
Once the scheduling table has been drawn up, conduct a “post-it note” meeting. Hand out post-it notes containing the names of all the tasks. Ask your team members to position them to create the correct order for the workflow.
Using post-it notes to track the progression of tasks in this way, a project plan lasting several months can be drawn up in just a few minutes.
Determining the length of activities
The duration of a task includes the actual work time as well as:
- The availability and the volume of human resources and materials
- Worker productivity
- Unavoidable delays within or between tasks
- Risks that may increase the estimated time needed for a task
Simon: I’ve helped assemble one of these kits before. It will probably take four days at minimum to get the things together.
Mona: The playscape needs to be durable to protect the kids, and it also needs to be sanded down and varnished. It will take a few days for the varnish to dry.
David: Once the turf down, landscaping will only take about a day. I can purchase the shrubs and flowers ahead of time.
Vishruti: I may be out of town off and on over the next month. Can you let me know when you’ll need me to help?
Matt: We need to account for a couple of days of bad weather.
To assess how long a task may take, calculate the average between the most pessimistic and most optimistic estimates.
- Pessimistic D = Normal duration, taking into account all possible risks that may occur throughout the activity
- Optimistic D = Normal duration, taking into account all favorable circumstances that may reduce the time needed
- Frequent D = Normal duration of a task based on general experience
The duration of a task should be estimated (or approved) by the person who will carry it out.
This practice sets clear boundaries and encourages ownership of the tasks.

To assess how long a task may take, calculate the average between the most pessimistic and most optimistic estimates.
When doing high-level scheduling, the time unit depends on the overall duration of the project.
If you are having trouble selecting a basic time unit, divide the total duration of the project by ten and use the closest time period to this result as your unit of time.
For example, if your project lasts 1 year, use one month as the time unit.
When creating a detailed planning schedule for each individual activity, it is essential that the unit of time used is the same for all the project activities.
Points to remember
By involving your team in the decision-making process, you are promoting:
- A positive view of the project plan and a positive attitude towards the completion of the project
- Ownership of the project by team members. Members are more likely to keep to the schedule because they’ve helped to produce it
Visualizing and adjusting free float in the project plan
Introduction
Check that the project plan meets the overall project deadlines:
- Calculate dates
- Calculate project slack
- Identify critical paths
Calculating dates
The calculations will give an objective view of the start and end dates for each task and for the project as a whole.
The calculations will give an objective view of the start and end dates for each task and for the project as a whole.
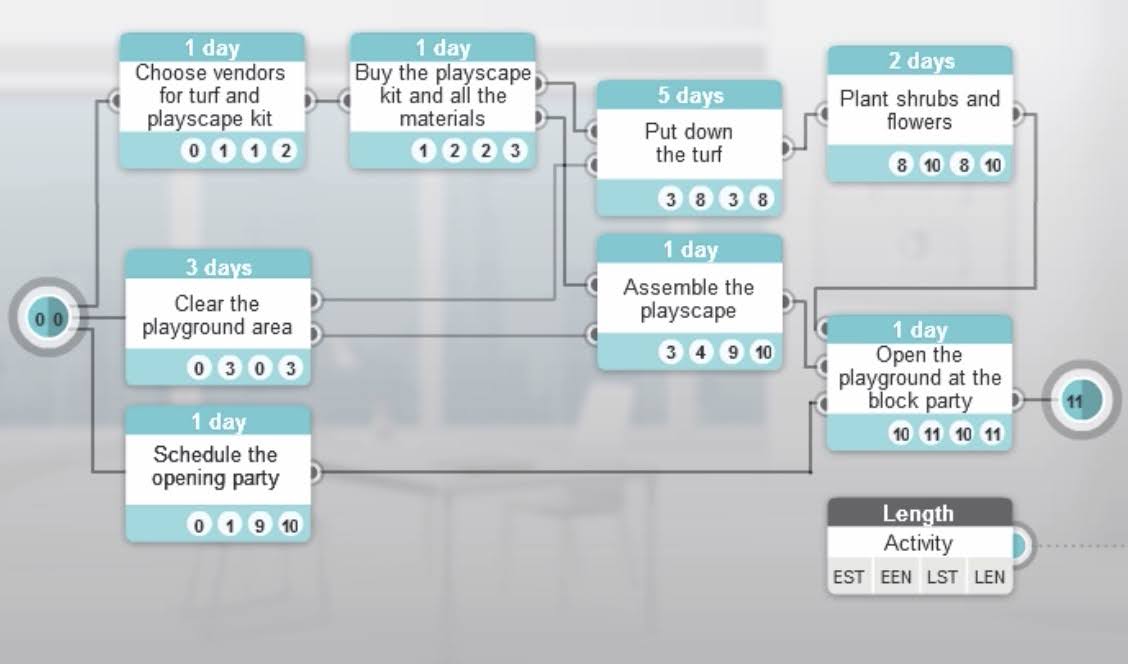
The following calculations will give an objective view of the start and end dates for each task and for the project as a whole. Starting from the “start” milestone (time 0), we need to calculate: From left to right (forward calculation), the earliest start and end dates beginning from zero. This will give the earliest possible completion date. It often results in a project completion date that is later than desired. here, you will notice that the project lasts 11 days rather than 10. Before trying to improve time efficiency, it is important to identify the genuine constraints and any slack in the schedule.
From right to left (backward calculation), calculate the latest start and end dates, bearing in mind that the latest and earliest end dates are the same. This calculation will give you the margins and gaps that exist between the latest and earliest dates for each task.
Identifying the critical path(s)
For some tasks, the earliest start date is the same as the latest start date.
These tasks that have no slack between them define the critical path of the schedule.
Calculating the free float
The task ‘Buy the playscape kit and all the materials’ will be finished by day 2 at the earliest. The task ‘Put down turf’ starts no earlier than day 3, leaving one day of slack, also known as the free float.
How many days do you think the task ‘Buy the playscape kit and all the materials’ can be delayed without impacting on the task ‘Put down the turf’?

How many days do you think the task ‘Buy the playscape kit and all the materials’ can be delayed without impacting on the task ‘Put down the turf’?
Answer is 0. The task ‘Buy the playscape kit and all the materials’ will be finished by day 2 at the earliest. The task ‘Put down turf’ starts no earlier than day 3, leaving one day of slack, also known as the free float.
The free float is determined by calculating the difference between the earliest start date (EST) of the following task and the earliest end date (EEN) of the current task.
In this case, there is no free float. Can we still delay the next task without affecting the whole project?
If so, by how many days?

In this case, there is no free float. Can we still delay the next task without affecting the whole project?
Answer is 1. Both tasks could be delayed one day without affecting the project as a whole.
The total float is the maximum amount of time a task can take without having a negative impact on the project’s target date.
The total float is determined by calculating the difference between the latest end date (LEN) and the earliest start date (EST) of the task in question.
Match each category with what the person in charge of the task needs to be told.
- Task on the critical path: No free float
- Tasks with free float: Free float
- Task with total float: Amount of free float depends on another team member
Points to remember
The following calculations give an objective view of the start and end dates for each task, and for the project as a whole:
- Figure out the earliest start and end dates beginning from zero: this will give the earliest possible completion date
- Before trying to improve time efficiency, identify the genuine constraints and any free float in the schedule
- Then, calculate the latest start and end dates
Calculating in this way allows the project manager to subject each task to a different level of control, based on the nature of the deadlines.
Formalizing and communicating the project team’s commitment
Introduction
To formalize your team’s commitment to the schedule, you will learn about:
- Creating the Gantt chart
- Choosing a planning tool
- Sharing the project schedule
Building the Gantt diagram
The Gantt chart represents all the processes that will be done in the project.
Colored bars placed on a time scale represent the length of each task, and arrows are used to mark the workflow between the tasks.
- Each task is represented by a line.
- The diamond represents the milestone for the beginning of the project.
- All tasks are represented by a bar. The length of the bar corresponds to the duration of the activity.
- The arrows represent the links between tasks as identified in the workflow. This is known as a Gantt arrow chart.
- Tasks on the critical path may be colored differently. In this case, they are red.
- The diamond represents the milestone for the end of the project.

The Gantt chart represents all the processes that will be done in the project.
The project schedule should always be created using the earliest start and end dates, except in the following cases:
- When the task costs a great deal. It is better to delay it as long as possible to relieve pressure on the finance department.
- When there is a high probability of uncertainty or risk associated with the tasks
For example, purchasing of materials may be delayed to the latest possible moment to ensure that funding is in place.
Choosing your planning tool
You can create your diagram using a simple spreadsheet program or software. Whichever program you use, the diagram will be an important communication tool for your project team.
Its effectiveness will depend on two factors, each of which causes provokes different comments from team members.
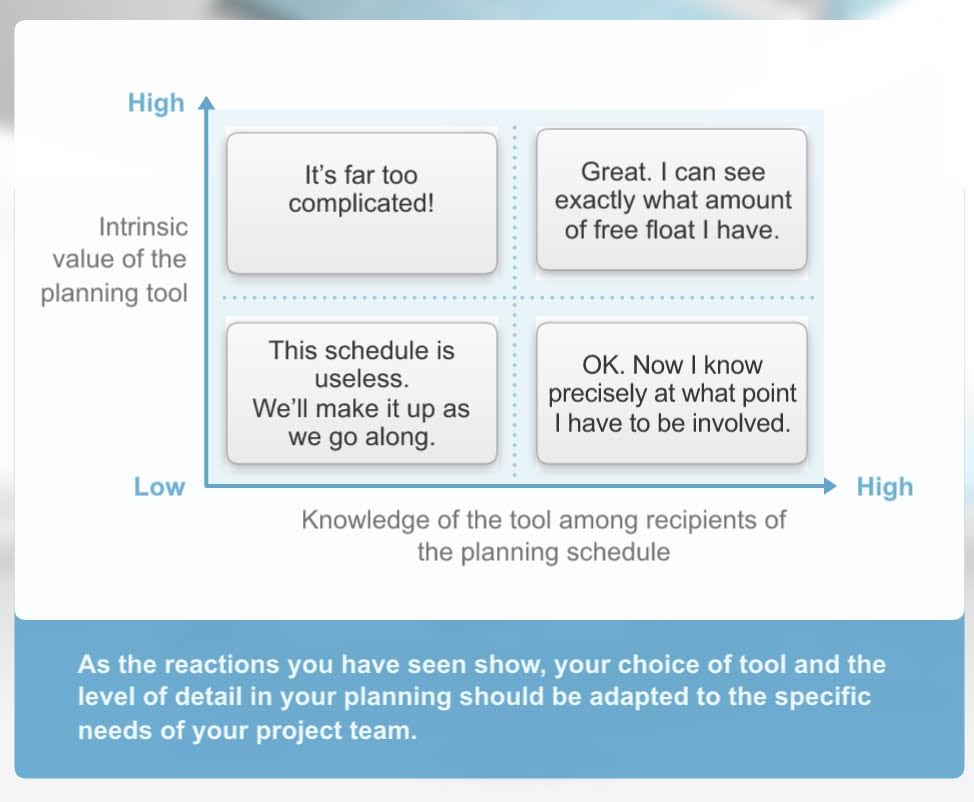
Its effectiveness will depend on two factors, each of which causes provokes different comments from team members.
As the reactions you have seen show, your choice of tool and the level of detail in your planning should be adapted to the specific needs of your project team.
Sharing the planning
Communicate with others about the project:
- Present an overall project schedule.
- Give each member the dates for the tasks they are involved in.
- Update the schedule as necessary, as the project progresses.
Manage the deadlines:
- Clarify the critical tasks for each individual.
- Notify team about the current drifts.
- Explain to the members behind schedule the impact on the project.
Points to remember
To realize a good formalization of team’s commitment, keep in mind the following points:
- Whatever software you use, the Gantt chart must communicate a clear message.
- The schedule is an important document for helping people make target dates. Take care when preparing it.
Conclusion
The planning process is an opportunity to obtain the team’s firm commitment to tasks and time frames.
The creation of the schedule formalizes this commitment.
While every project schedule is specific to a given project, if the workflow is well-defined, it will be possible to anticipate delays or slow-downs.
Warning: Simply creating a schedule does not guarantee that project deadlines will be met. Every project requires project management for that.
Key Messages
Projects in which the team has a lower level of experience, or for which the deadlines are stricter, will require more team involvement in the planning process.
The initial aim should be for the team to identify the processes by which the project will be executed.
The first four stages in this methodology will include four ways of engaging team members in the project plan.
Stage 1: Building the list of activities with the team
Ways of engaging project team members:
- Don’t propose activity task without defining who is responsible for it, based on the individual’s ability and desire to take charge of it, and
- Providing a list of all tasks is a way of reassuring the team members of the project’s feasibility, even if it still contains an inevitable amount of unknowns at this stage – dare to move forward and accept uncertainty.
Stage 2: Identifying continuity constraints
Each team member must identify the task or tasks that ‘Immediately Follow’ (IF), i.e., those that can be started once their task has been completed.
Stage 3: Defining the links
Stage 4: Determining the length of activities
Engage team members by including them in the scheduling process. Ask each team member to estimate (or approve) assigned tasks.. At this stage of the process, it is pointless to impose a deadline on this person, especially if they already have the experience to know that it is unachievable.
It is difficult to estimate the exact duration of activity task, especially if you don’t yet know when it can be started or if the resources will be in place. However, you can have a general idea of the duration of the task in ideal conditions, as well as its duration in the worst possible conditions. Based on your or team members’ prior experience with this type of work, you can make a statistical calculation to determine the ‘normal’ duration of a task – i.e., the most frequent duration observed.
This method is also a way of setting clear boundaries and preventing abdication of responsibility by the person in charge of each activity, who will naturally have a pessimistic view of how long the activity will take.
Engaging the project team members in the process: Asking team members to identify tasks that immediately follow their own task develops their awareness that other people depend on their work, and that they will need to keep to their position in the workflow and the deadlines they have been given.
Engaging project team members in the process:
Once the scheduling table has been drawn up, hand out post-it notes containing the names of all the tasks and ask your team members to place them on a card to create the correct order for the workflow.
Using post-it notes to track the progression of activities in this way, a project plan lasting several months can be drawn up in just a few minutes.
When planning, the unit of time you use depends on the overall duration of the project.
If you are having trouble selecting a unit of time, divide the total duration of the project by ten and use the closest time period to this result as your unit of time.
For example, if your project lasts 1 year, use one month as the unit of time.
When creating a detailed schedule at the task level, it is essential that the unit of time used is the same for all the project tasks.
Visualizing and adjusting free space in the project plan
Calculating dates: This is the stage of the process at which the most restrictions apply, as it often results in a project completion date that is later than desired.
Identifying the critical path: The critical path represents those activities that have no free time, in the sense that a delay in any one of these activities will have repercussions right along the workflow, and will result in the project’s being late.
Calculating free and total margins: Calculating the dates in this way gives an indication of the free time that each activity possesses. There are two types of free time:
- Free margin: if this margin is used up, the task(s) immediately following will be affected and will be late as a result.
- Total margin: if this margin is used up, the final project delivery date will be affected.
Identifying the effect of margins on the project manager’s control:
Calculating margins in this way allows the project manager to subject each of task to a different level of control, based on the nature of the deadlines: First priority, critical tasks (Total margin = free margin = 0): The people involved must commit to their target dates. Any slippage will affect the next tasks in line, and could result in missing the target date.
Second priority, tasks that are not on the critical path: The person involved will have to be careful with the amount of margin available, not to infringe on the critical path and delay the entire project (total margin = free margin ≠ 0)!
Third and final priority, all other tasks, (total margin ≠ free margin).
The free margin is determined by calculating the difference between the earliest start date (EST) of the following task and the earliest end date (EEN) of the task in question.
The total margin is the maximum amount of time a task can take without affecting the project deadline.
If a task is delayed beyond this limit – the total margin – there will be at least some impact on the the project’s deadline.
The total margin is determined by calculating the difference between the latest end date (LEN) and the earliest start date (EST) of the task in question.
Formalizing and communicating the project team’s commitment
The Gantt chart: The Gantt chart is the end result of all discussions and agreements. It is the tool that will be used to manage project deadlines.
The workflow is transposed directly into the bar chart timetable. Colored bars are placed on a time scale to represent the length of each activity.
Four tips for creating a Gantt chart:
- Set all activities either by their earliest or latest deadlines.
- Show the free and total margins for each activity on the bar chart.
- Clearly highlight the critical path.
- Optionally, use arrows to represent the links between tasks as identified in the workflow.
The Gantt chart is a project communication tool. Simplicity is always preferable to information overload!
Choosing your planning tool
The effectiveness of your schedule will depend on two factors:
Effectiveness = Built-in value of the planning tool X Recipients’ familiarity with the tool
Finalizing the project plan
Once the Gantt chart has been created, the project manager can send it to all those involved in the project.
This schedule becomes the initial reference document (benchmark) against which the team can measure their progress at every stage of the project.
The schedule should always be created using the earliest start and end dates, except in the following cases:
- When the task costs a great deal, it’s better to delay it as long as possible to relieve pressure on the finance department.
- When there is a high probability of uncertainty or risk associated with the tasks.
For example, purchasing of materials may be delayed to the latest possible moment to ensure that funding is in place.
Conclusion
By following this methodology, you can be confident that you have carried out a detailed analysis of all the project’s constraints, and that the outcome is a realistic schedule that accounts for the parameters set out at the start of the project.
With a well-defined project plan, you will be better able to anticipate any possible future delays.