This article will teach you how to build a Messenger bot that captures email addresses using a Lead Magnet. You’ll learn how to use your chatbot to nurture those leads and turn them into customers. Ultimately, the goal of this training is to launch a profitable chatbot campaign with content you already have.
What You’ll Learn: The steps to map out and build a successful Messenger campaign to generate leads
Table of Contents
Table of contents
Understand the Purpose of a Chatbot Lead Magnet Campaign
Understand the Objective
Set Up Your Tools
Choose Your Lead Magnet
Create Your ManyChat Account
Connect the Facebook Page You’ll Use for This Campaign
Map Out Your Campaign
Determine Your Entry Points
Map Out Your Campaign
Install ManyChat Template
Set Up Your Entry Points
Create Your Campaign
Edit ManyChat Flow: “Opt-in Flow”
Edit ManyChat Flow: “Lead Magnet Content Flow”
Edit ManyChat Flow: “Lead Magnet PDF Flow”
Edit ManyChat Flow: “Follow-up Flow #1”
Edit ManyChat Flow: “Follow-up Flow #2”
Launch You Bot
Understand the Purpose of a Chatbot Lead Magnet Campaign
Understand the Objective
This article will teach you how to build a Messenger bot that captures email addresses using a Lead Magnet. You’ll learn how to use your chatbot to nurture those leads and turn them into customers. Ultimately, the goal of this training is to launch a profitable chatbot campaign with content you already have.
With this article, we’ll be covering:
- What content you should use for your Lead Magnet
- How to map out your Messenger campaign
- How to build your campaign
Let’s get right to it!
Set Up Your Tools
Choose Your Lead Magnet
Now, this doesn’t have to be a Lead Magnet. We highly recommend that it is, but it can just be a piece of content. This could be a blog article, long-form email, or even a transcribed video.
But at minimum, it should be a piece of content that you’ve already used to convert. And we recommend that for your Lead Magnet too, it should be something that has already generated opt-ins.
This is key because this is what your Messenger campaign is going to drive people to, so you can generate leads.
So whatever you pick, make sure it’s proven content—meaning your audience has already shown interest in it. Using proven content will help you get ROI immediately, and prove Messenger as a new channel for your business (with data).
So what’s the ideal piece of content?
Generally, it’s best to use…
- A how-to guide, i.e. “How to __,”
- Step-by-step breakdown
- Step-by-step content
These content types with these specific kinds of sections make it easier to determine how to break up the bot messages.
It’s also important that the Lead Magnet/content you choose to have some sort of copy available in it because the idea is to break it down in your Messenger bot. So you go…
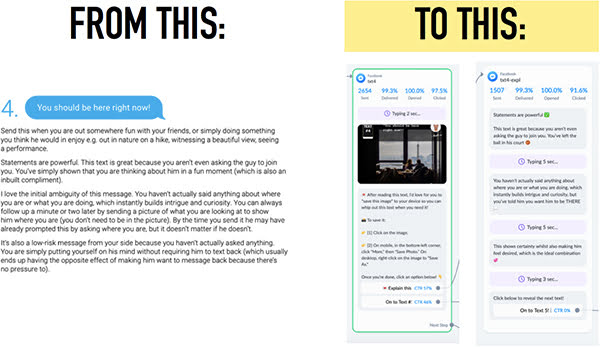
There’s a lot of different ways to do this and you can really get creative with it. You can see in the image above that we break up the text, add emojis to draw the eye to specific parts, and even take something like the text example on the left and add an image. That makes it a lot more digestible than a 20-page PDF.
So take a minute now to think about what piece of content you’ll use.
Create Your ManyChat Account
There are other bot tools you can use, but this article will focus on ManyChat. If you don’t use ManyChat, you can still apply the steps and the strategies of this training to the Messenger Bot of your choice.
Go to ManyChat to set up your account. You can use the DM Deal for ManyChat.
Think of ManyChat as your CRM and email marketing software in one. This is where you host your bot list and where you create your content.
Connect the Facebook Page You’ll Use for This Campaign
Remember: your chatbot list will be attached to this Facebook page, so take a moment to decide which of your Facebook pages you’ll choose.
But before you do that, there are a couple of important clarifications:
- You can only connect a bot to a Facebook page. You can’t connect it to a group or a personal profile
- The messages from your bot can be viewed on the Facebook desktop browser or within the Messenger mobile app
So let’s say you have 2 Facebook pages for a franchise, and you want to use a chatbot list for both of them, you can’t transfer lists or combine them. So thinking long-term, make sure the chatbot list you want to use is attached to the right page.
Now that you’ve set up your tools, it’s time for…
Map Out Your Campaign
Entry points allow you to capture email subscribers. For instance, you might use an opt-in form on your website that leads to an email capture on the back end.
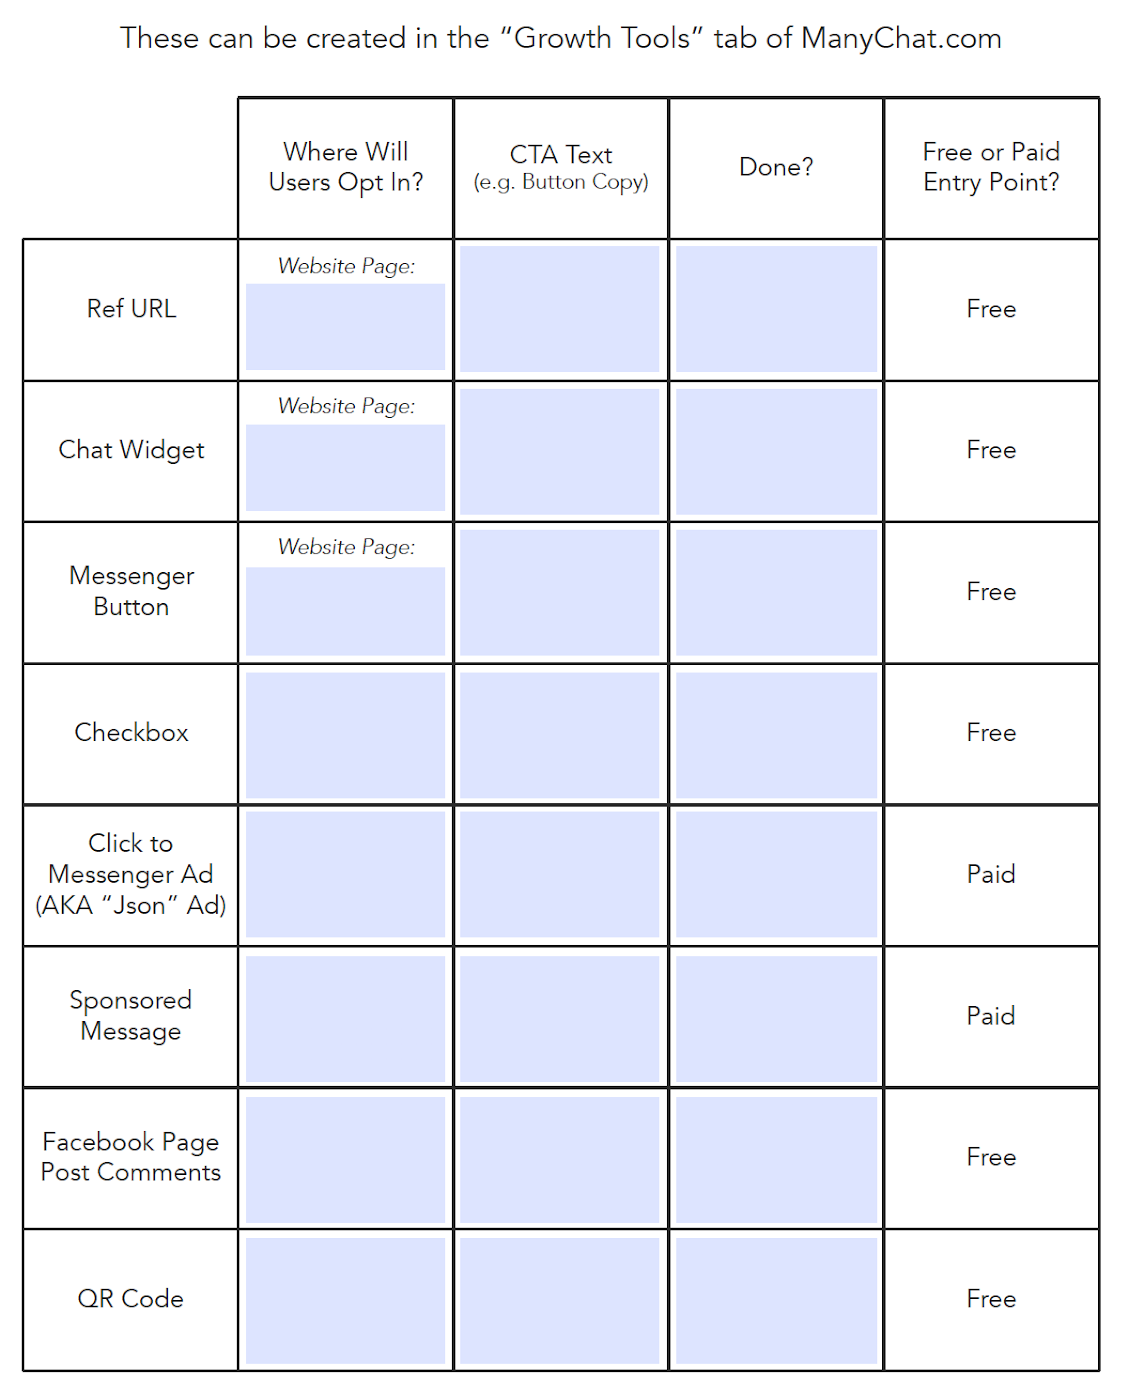
But with Messenger, you actually have 9 entry points:
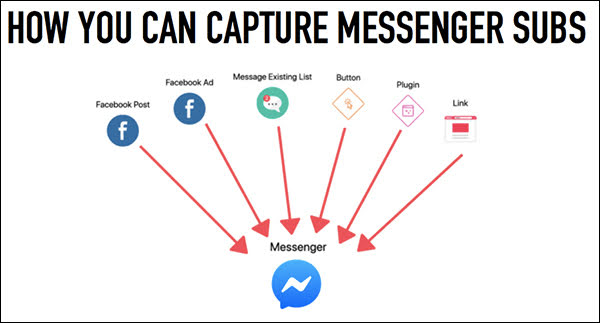
There are only 6 entry points listed in the image above, but that’s because a couple can be doubled as another type of entry point. For example, a link can become a QR Code.
So here are some examples of these.
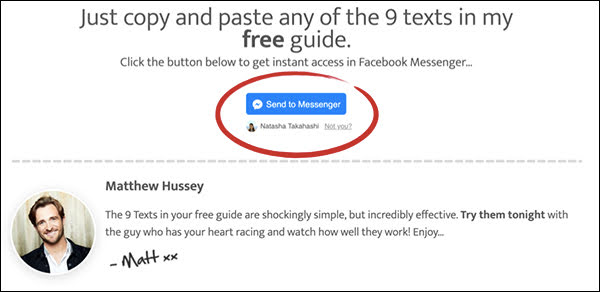
First, we have an example of a button. This is a one-click opt-in. Someone can click that button within Facebook on their browser and that directs them to Messenger.
You can also have a setting that directs them to a URL.
Next, we have a check box:
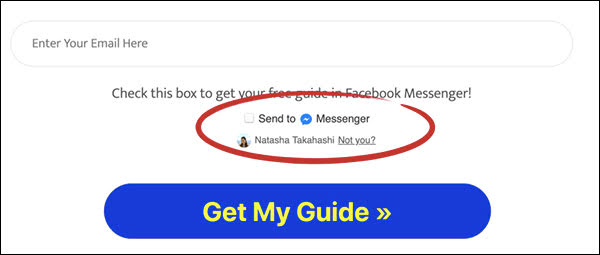
You can use the check box in combination with email. This is a way to test which one gets you more opt-ins: email or Messenger. It’s worth noting that because this option requires the user to manually check the opt-in box, it usually gets fewer conversions than the button.
Next is an example of using a link but attached to a web button.
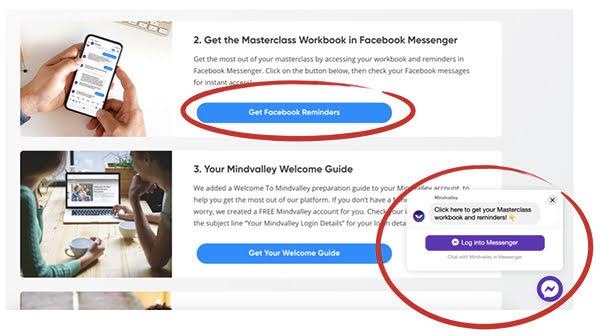
This has a chat widget (lower right) but has a chat button above—which has a much more powerful technology attached to it via Messenger, so they tend to get better results than the typical widget you might find with help desk software.
Our next example is using an opt-in through a Facebook page comment.
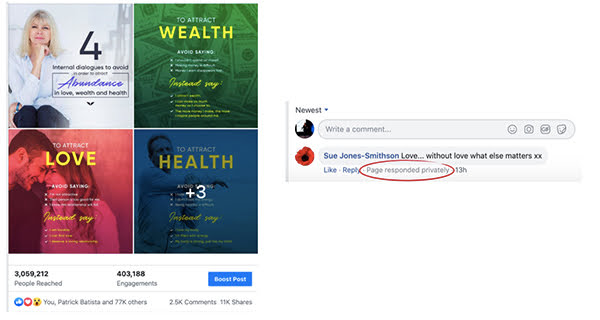
This allows you to respond to comments with your bot. It’s a great way to reach people, especially if you have organic posts that get a lot of traction, or if you’re running a post as an ad.
But first, a few examples of what this is going to look like on the back end.
You’ll see a REF URL, which is a link option inside of ManyChat. There are 2 ways you can utilize this, a web button or a QR code.

You can also turn this link into a “deep link.” If you want someone to look at something in an app, using a deep link would allow them to jump straight into that app right to whatever you want them to see.
Deep links are great for email marketing if you need someone to jump straight from their Gmail into Facebook.
So pick at least 1 way your audience is going to enter your Messenger bot campaign and then move onto the next step.
Determine Your Entry Points
Use this worksheet to map out your Lead Magnet campaign. The worksheet will help you plan your campaign from beginning to end. It also replicates what you’ll see in ManyChat.
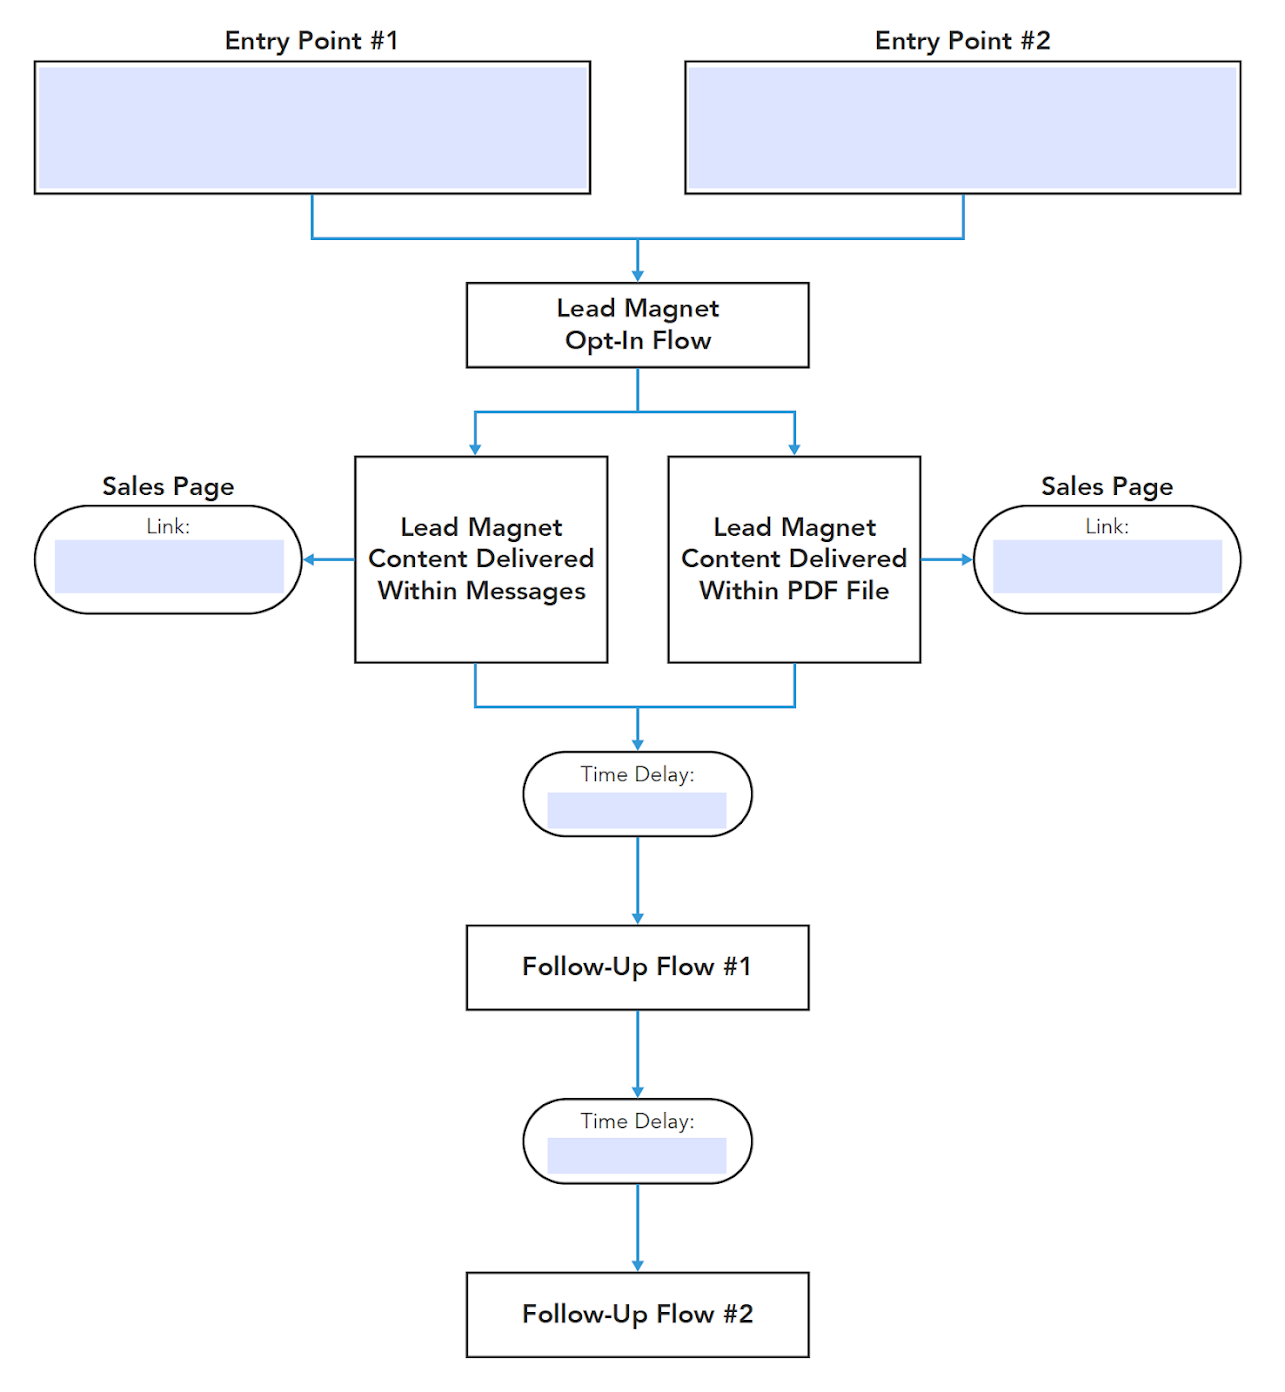
The first things you’ll see are labels for Entry Point 1 and Entry Point 2. These are the 2 ways you’re going to create to get people into your campaign. (You can actually create as many as you want.)
From there you’ll send people to the Lead Magnet Opt-In Flow. From here, you’ll create a split to see what’s the best way to deliver your Lead Magnet to your audience. What’s their ideal delivery method?
One version of the split test is your Lead Magnet broken down into messages. You can think of this like a welcome email you might send saying, “Congratulations, here’s your Lead Magnet.” So that’s what this piece allows us to do.
The other half of the split test is just the PDF file by itself. So you’d say, “Hey, here’s your PDF file.”
The split test is part of the campaign and will let you see what the difference is compared with the same content broken down versus in its current format, all in the same Messenger channel.
Then, you’ll determine your follow-up messages and how long until you’ll follow up with them. The time delay bubble is for you to determine how much time you want to pass before you follow up. Due to changing policies, you’ll want to message your users in 24 hours or less since their last conversation with your chatbot. You can message people outside of this 24-hour window using something called the One-Time Notification. Here’s how to get access to it on ManyChat.
Map Out Your Campaign
Install ManyChat Template
Now, it’s time to install the ManyChat template. You can use this link to set it up.
It will lead you to a page that looks like this:
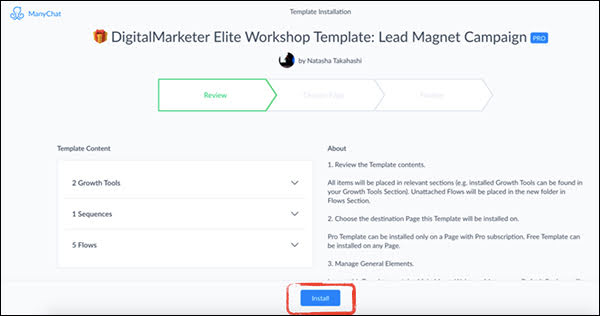
Click the “Install” button at the bottom. You’ll then be prompted to enter what page you want to install this on.
You can use the page you either just connected to ManyChat. (This won’t affect anything if you’ve already built something inside of ManyChat, so it’ll just appear as a place to work within ManyChat.)
Hit “Install” on the finalization screen.
When it’s installed, it will take you to a finalization page.
Set Up Your Entry Points
Set Up Your Entry Points—these are called “Growth Tools” inside ManyChat. But Facebook calls them Entry Points, so we’re using the same term.
As you get started, we do have a couple of “don’ts.”
- Don’t overwhelm your users with too many options or decisions to make
- Don’t distract from the main CTA
So we suggest a maximum of 2 Entry Points (or Growth Tools) per page. In many cases, you may only want to do 1, like a button so it’s super clear and direct.
Inside the Entry Point tab, you should see 2 options to choose from. Click into “Growth Tool #1,” and a new dialogue box will appear. This is the “Opt-In Actions” tab. That tab will be good to go—it’s already connected to the correct “Flow.”
You can customize your URL by going to the “Setup” tab.
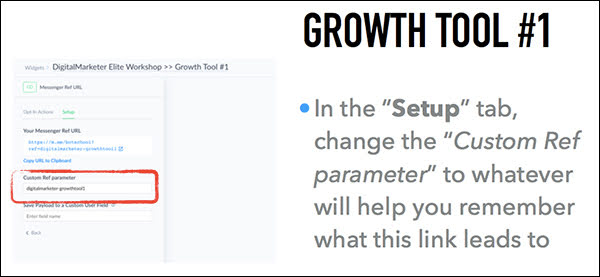
Change the “Custom Ref Parameter” to whatever you want to call the link. Choose something that helps you remember what it is, even if it’s just the name of the asset.
Then click the SAVE button in the top-right corner.
Now you can use this link anywhere. Attach it to a web button, an Instagram bio link, even Facebook and Instagram Stories swipe-ups—anywhere a link can be used that you’re pointing people toward some sort of free content.
On to Entry Point #2!
Click the Widgets button in the top left corner. (You can also click Growth Tools again from the left-hand menu.) That will take you back to your list and Growth Tool Number 2.
That will take you to a page that looks like this:
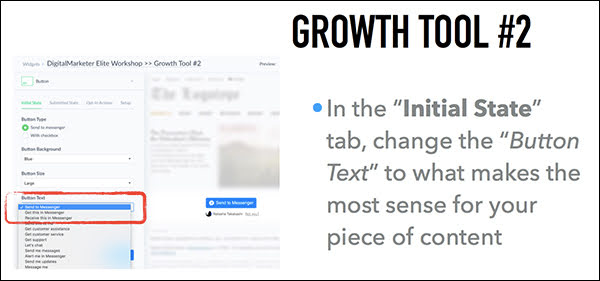
This is a button, but it’s already optimal, so don’t change anything except the button text. Adjust that to whatever CTA you want to use.
Now we’re moving on to the second tab, it’s called “Submitted State.” This shows what it looks like to the user after they click your button.

You can change the text in the box to a CTA that fits your particular audience.
That button will take the user to Messenger to access the content you’re giving them.
Now we move on to the third tab, called “Opt-In Actions.” You don’t need to do anything here—it’s already connected.
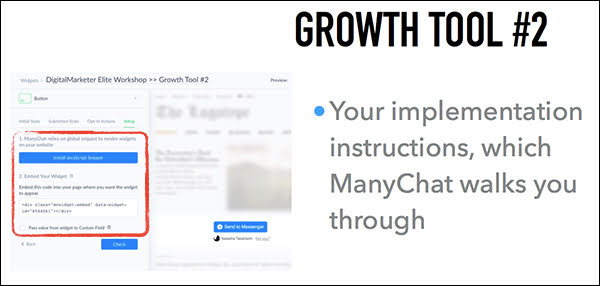
Finally, click on the Set-Up tab. You don’t have to do anything here, but you can use it to test it out on a website page if you wanted to see what it looks like. ManyChat will walk you through it, but there are basically 2 pieces of code you’d need to install. One is in the header of your website page and then an embed code that actually makes your button appear.
So take a few minutes now to test that out on your landing page.
Create Your Campaign
Edit ManyChat Flow: “Opt-in Flow”
Now it’s time to create your campaign!
In this portion, you will be going through and editing the flows you have inside that ManyChat template.
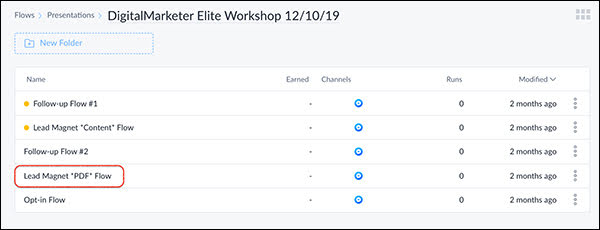
Go to the left-hand column inside ManyChat and click “Flows.” Your flows should be in folders inside there.
So what does the Opt-In flow look like?
This is the first message someone sees from your bot once they were opt-in. You saw on the worksheet we have our entry points and then we’ve got the Opt-In Flow.
Here’s an example that you’ll see in the ManyChat Flow that we’ll take you through.
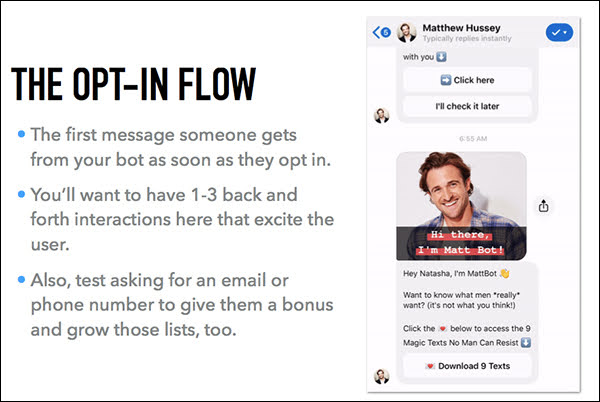
Here you want to have 1 to 3 back and forths that will excite and entice the user.
This is also a great place to get their email or phone number if you haven’t already. To do that, offer them a “bonus” that’s related to your Lead Magnet offer. The idea is to have an incentive here to get another contact method.
Now jump over to “Opt-In Flow.”
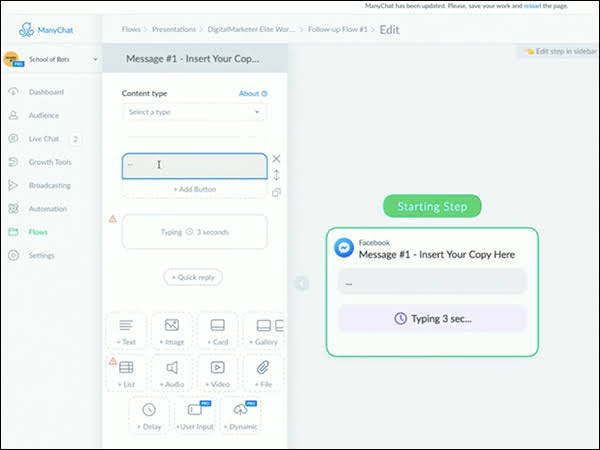
In the top right corner, you should see a button that says “Flow Builder.” When you click it, it shows a flow chart that’s inside.
Zoom out so you can see everything. You’ll see some yellow comment boxes with comments from DigitalMarketer that explain why certain things are happening.
Where you act is within the boxes that say, “Insert Your Copy Here.” There should also be a little green box that says “Starting Step.” That’s where you edit this.
In the top right corner of the screen, you’ll see an “Edit Flow” button that will allow you to edit this whole thing.
Edit ManyChat Flow: “Lead Magnet Content Flow”
Go back to the folder from earlier, where you’ll see another flow that says “Lead Magnet Content Flow.”
So how many interactions should you have with the user as they go through your content?
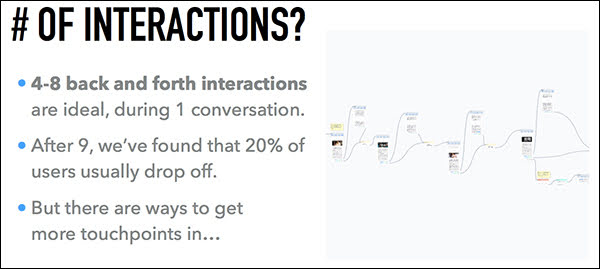
Ideally, you want to have 4 to 8 back-and-forth interactions during 1 conversation.
We find that after the 9th interaction, 20% of users usually drop off. So if you go beyond that, you’ll lose them before you can get to your call to action.
But when you can start with an ideal number of interactions and then add more touchpoints in if the user tells you they prefer them, then that’s a better way to add in additional interactions.
The way to do that is in this example:

We have the message on the left—one piece of the Lead Magnet PDF examples we’ve been using—and we have 2 options for a user to continue.
So give them the choice of either “Explain This,” or “Continue.”
That way, if someone just wants to get through as quickly as possible, that’s available to them.
But if they want more out of your content, you can take them through more content and value-add. This is a good way to increase those touchpoints with your brand.
Edit ManyChat Flow: “Lead Magnet PDF Flow”
Now let’s jump into the “Lead Magnet PDF Flow.”
Go back to the Flows folder and select Lead Magnet PDF Flow.
The PDFs folder is very minimalistic compared to the “content flow.” All you’ll do is give users a little bit of context from what you set in the Opt-In flow, and then sharing the PDF link. (You want to do a link rather than a file because a link will allow you to track how many people open it.)
In Messenger, it’ll open nicely inside the conversation so that the user doesn’t even have to leave the app.
This is how it’ll open inside the Messenger app:
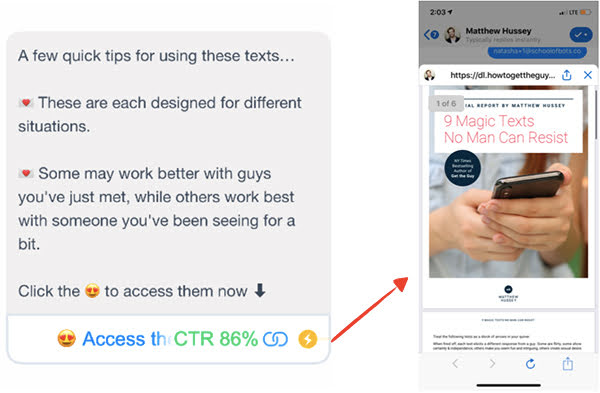
(On the desktop, it’ll open in a tab.)
Edit ManyChat Flow: “Follow-up Flow #1”
Let’s move on to follow up. You’ve built the content the user is experiencing inside the bot, and now there’s follow up which should come from the fact that you’re basing this off some sort of converting campaign.
You want to follow up for 3 to 7 days about the same offer. After that, someone’s going to get really tired of this. (You can also view that as 3 to 7 messages.)
The limit is so you don’t overwhelm or annoy your prospect and ultimately your bot doesn’t get banned from the Messenger platform.
Each of these days or messages should contain valuable back-and-forth interactions. You don’t want to treat this like email, where there can potentially be a lot of fluff.
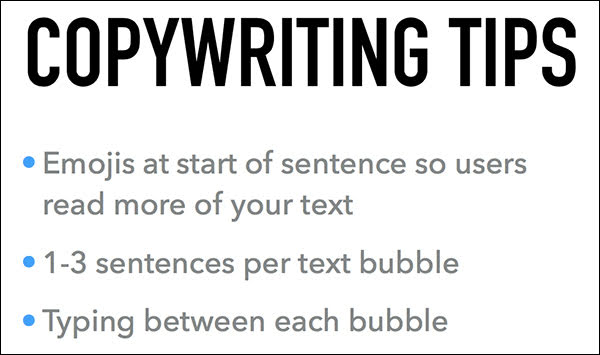
First, a few copywriting tips:
To see what we’re talking about, go to the “Follow Up Flow #1” folder (inside your DigitalMarketer folder), and go into the “Flow Builder” view.
You can see the “Delay” button in the lower-left of the next screengrab:
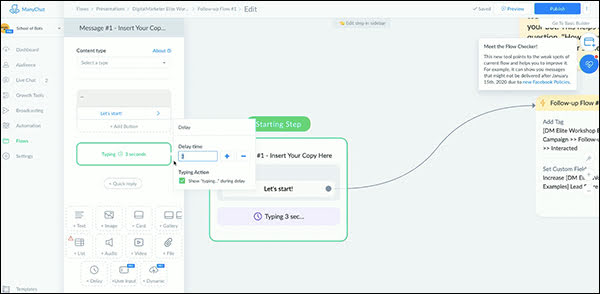
You can edit the length of your typing delay there. Usually, 2 to 10 seconds is ideal.
We suggest putting 1 to 2 sentences in the grey bubble on the left side of this screengrab:
Then you might add a typing delay, then a couple more sentences. Then, you should add an interaction. You can ask them to type a response, or you can also add a quick reply (you’ll see those above the other options there). Ask them to do one of these things so that way they’re involved in the conversation.
Keep things short and concise. (For instance, if you’re converting your landing page copy into your bot conversation, you can probably cut 2/3rds of it because they’ll see it on the landing page when they click over.)
Go in and play around with adding your content to the Flow. Boil your content down to the most necessary pieces and pop them into the flow with some transitions.
Edit ManyChat Flow: “Follow-up Flow #2”
Jump back into the folder and open “Follow-up Flow #2.” The same things we discussed with Follow-up #1 apply here—all the copywriting tips and what we discussed concerning the strategy applies here.
For this one, you can get a little creative. We’ll leave that up to you. smile
Launch You Bot
Now it’s time to launch your bot and start generating leads from it!
Before you launch, use this checklist to audit your chatbot campaign, to ensure that your campaign launches on the best foot possible.
- Have you created your campaign flowchart?
- Have you edited all of the “opt-in” ManyChat flows (3)?
- Have you edited all of the “follow-up” ManyChat flows (2)?
- Are you asking for at least 1 other contact method from the user (email, phone number)?
- Have you started to drive traffic to one of your growth tools (AKA“entry points”)?
- Notes: Connect your ManyChat bot to your CRM using Zapier (zapier.com) or Integromat (integromat.com), to track purchases to stop the follow-up sequence for buyers.
As the data from your campaign comes in, your next step will be to optimize your bot, looking for ways to grow and refine the campaign. We have 2 worksheets to help you do just that.
First, use How to Continue Growing Your Lead Magnet Campaign.
Next, use the Planning Your Entry Points. This goes a little further than the Entry Points worksheet you did earlier in the article. The worksheet will help you see what your options are as well as give you an idea of where users might be coming in from. You can also use this worksheet moving forward for any future campaign planning.
And with that, you have everything you need to launch a successful Messenger bot campaign to generate leads.