A strong email list is an essential part of every marketing campaign. But building out that list can seem like a daunting task. Luckily, this Playbook will be your roadmap. It will take you through every deliverable you will need to build out a funnel to attract new leads and email subscribers.

What You’ll Learn:
- All the different deliverables you’ll need to drive traffic and build your list
- Tips on how to choose the right ESP for your business
Table of Contents
Every Marketer Needs a List
Understand the Power of Email Marketing
If you aren’t already taking advantage of the amazing ROI you could achieve from Email marketing, you should start now. At DM, roughly 20% of our total sales come from our Email list. It’s arguably one of the most important tools in your marketing tool kit.
The only way to successfully utilize your email is if you have a list of targeted, engaged customers that want to learn more about your products and purchase. So, where do you go to get these kinds of leads?
Some people take the easy route and buy a list of leads. We here at DM believe that the best leads are the ones you earn yourself! Therefore, building an email list comes down to creating a funnel.
Every marketing funnel requires a couple of different deliverables such as Lead Magnets, landing pages, blog content, etc. Luckily, you have access to in-depth training on each of these different deliverables.
Think of this Playbook as a roadmap, guiding you through the process of creating an email list, and aggregating information on building out each deliverable. We will also walk you through one of DM’s own funnels we used to increase our email list.
Before You Start Acquiring Leads
Determine Your EMS/ESP
Before you start developing an email list you need to know where you’re going to keep track of all that information. This means you’re going to need an Email Service Provider (ESP) or similarly, an Email Marketing Software (EMS).
When Choosing an ESP, what’s right for you might be very different than what’s right for us here at DigitalMarketer. Choosing the right platform comes down to a few important points:
- Cost: Usually the biggest determining factor, your budget will really help you narrow down which tools are within your range.
- Features: Every ESP will have their own unique features, but some essential features we recommend are: automation, tracking tools, list management, and reasonable/affordable options to grow your sending capabilities as your list grows.
- Deliverability: It’s your job to make sure you are sending good quality, non-spammy emails to keep them out of the spam/promotions tab. However, your ESP will play a part in your email deliverability, so make sure you do your research when seeking an ESP
Action Item: Do your research and start looking for an ESP!
You don’t have to have an ESP to move onto the next step, but you will need one before you actually start acquiring leads, so it’s a good idea to start looking now.
Identify Your Audience and Avatar
This is pretty much a no-brainer. To acquire leads, you need to know who your target audience is.
We’ll briefly cover that here in this lesson. And if you’re looking to dive deeper into this subject, we recommend you check out our Customer Avatar Playbook, which will help you discover who your target audience is and how you can further understand their mindset and create content that will help them solve their problems.
The first step in building that target audience is by defining “them,” the customer, as much as possible. With the help of this canvas, you can bring your target audience to life, thus allowing your company to lock in a more definitive path to connecting with your audience.
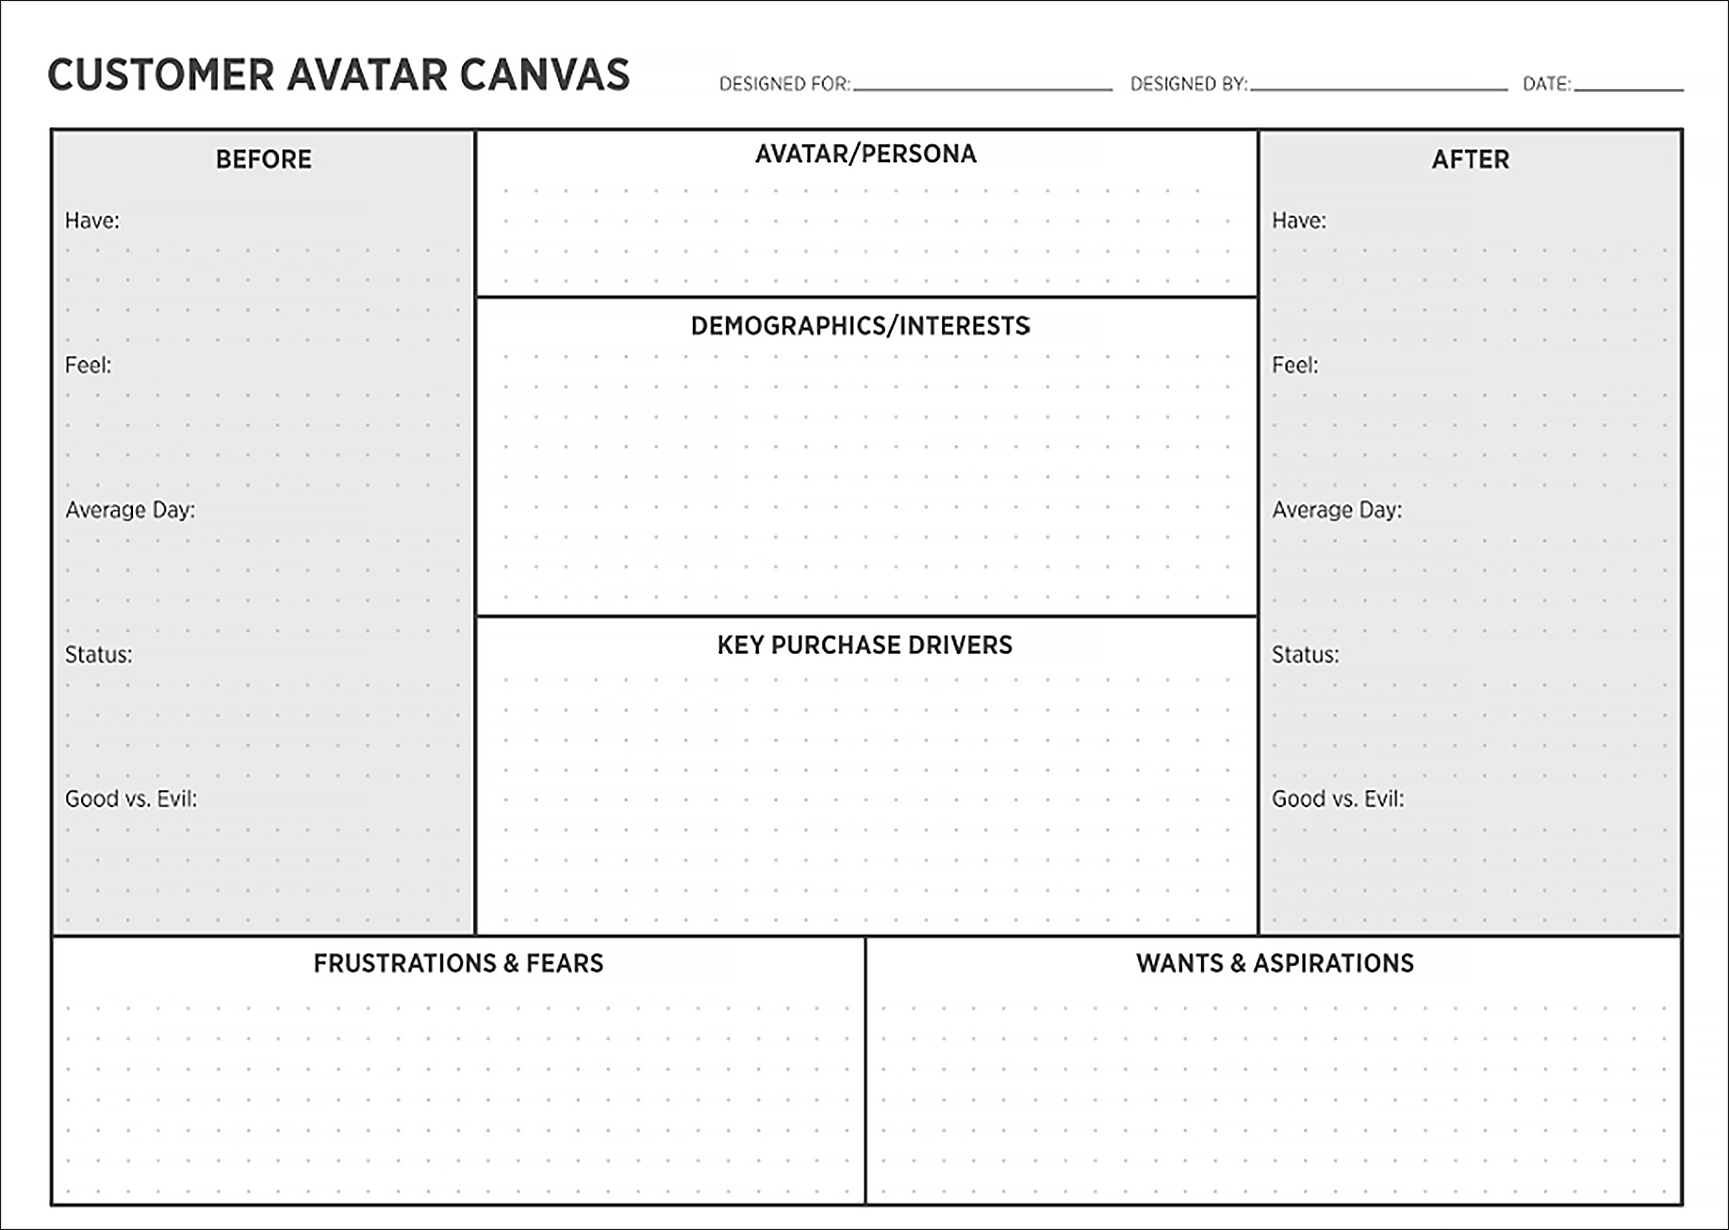
As you literally build your ideal customer, there are some key points to keep in mind.
First, when you create a customer avatar, you’re actively choosing who you want to work with. This customer avatar isn’t necessarily something that should be permanent. Just like industries are always innovating and adapting to change, your customer’s needs/wants to adopt as well. So you’ll need to update this canvas from time to time (we recommend you revisit it once a quarter to make sure it’s still up-to-date).
Second, there’s no research requirement to begin this avatar, you can start it with little to no knowledge about your customer. Though that doesn’t mean you can skip the research. It’s is in both your and the customer’s best interest to better understand the key components of the avatar builder, such as customer demographics, key motivators/purchase drivers, and the before/after states. Point is, you shouldn’t let research deter you. Take it one step at a time.
ACTION ITEM: Start building your customer avatar with your current knowledge now, while focusing on who exactly they are, so you can expand on intricate details that are important to understand before they make the first purchase.
The Before and After States
Once you familiarize yourself with the different aspects of the avatar builder, you can go 1 step further and dive into the Before State of the customer’s persona. You’ll find this on the canvas from the last lesson and can fill it out there.
To truly understand your customer, you need to understand how and what that person is feeling BEFORE they purchase your product/service. Then, on the flip side, you need to understand how and what that person is feeling AFTER they buy from you.
After all, one main marketing point to remember:
People don’t buy products or services…
They buy transformations.
Your product/service helps to transform them. It helps take them from their Before State to their After State.
To do that (and fill out your canvas), ask yourself questions like these:
- What events or feelings are going to lead your customer to your business?
- Why are they coming to your business specifically?
- What evil are they facing in a diversified workforce and how can you fix it?
When you begin to understand the why in the customer’s needs you can better facilitate your product/service for the customer as a whole.
ACTION ITEM: On the Canvas, fill out your customer’s Before State. Think of emotions, current actions, and state of mind that your customer persona may be in before purchasing your products/services.
Now you can look at the After State, seemingly easy though still important, which builds the potential for customer loyalty beyond the completion of the sale. Essentially, what does life look like after they’ve bought? How has it transformed? How is it different? What are they doing and thinking and feeling that they weren’t before?
As straightforward as this process may seem, it’s crucial for building not just an email list, but also a personalized customer list that you can use to better understand and better fulfill their needs and wants going forward.
ACTION ITEM: On the Canvas, fill out your customer’s After State. Think of emotions, current actions, and state of mind that your customer may be in after purchasing your products/services.
Create a Funnel to Entice New Leads
Create Your Lead Magnet
Since you’ll be starting from scratch, the best way to build out a list is to start with a Lead Magnet. Your Lead Magnet will be the main draw for your customers. It should provide a quick win and prime your customer for your core offer.
For example, at DM we launched a new funnel for our Insider group, which is a free content subscription to limited sections within DM Lab, and access to the weekly Insider Newsletter.
To try and increase our Insider sign-ups, we put together a lead magnet based on some of our most trafficked blog posts, the annual “Top Email Subject Lines of [insert year]”. Since we knew that this topic was important to our core audience, we figured it would be a perfect tool to attract the attention of new leads.

Since we knew that this topic was important to our core audience, we figured it would be a perfect tool to attract the attention of new leads.
The tool is full of a list of the best-performing subject lines from our emails. It provides a quick win for our audience without a ton of effort on their part. Just pick a subject you like and make it your own.
Now it’s your turn…
To get started, here’s a basic flowchart, a sample from our Lead Magnet Playbook, of how initial clientele channel through fulfillment or to a cycle back toward the Lead Magnet itself.

To get started, here’s a basic flowchart, a sample from our Lead Magnet Playbook, of how initial clientele channel through fulfillment or to a cycle back toward the Lead Magnet itself.
Conceptually, a Lead Magnet is exactly what it sounds like: a “magnet” that pulls prospects into your marketing funnel by giving them a specific chunk of value in exchange for their contact information (usually an email address). Your Lead Magnet’s goal is simple, yet crucial: it converts traffic into leads, helping you to build a list of prospects that you can nurture over time.
Think about how it connects to that Before State your prospects are in and how you can draw them toward the transition from prospect to customer.
ACTION ITEM: Build your own Lead Magnet that suits a specified customer avatar you’ve created.
Remember, your lead magnet, like the avatar, is not universal for all prospects, but instead is for one set customer profile.
Create a Squeeze Page for Your Lead Magnet
Now that you have a lead magnet build-out, the next step is to create a squeeze page for your lead magnet.
This is the landing page where your leads will exchange their email for your Lead Magnet. You’ll want to have a really simple form that asks for essential information only. Chances are these leads know practically nothing about you, so it’s hardly appropriate to ask for your lead’s phone number, interests, or any other tidbits.
For the case of our Insider funnel, our squeeze page looked like this…

For the case of our Insider funnel, our squeeze page looked like this…

For the case of our Insider funnel, our squeeze page looked like this…
It outlined the compelling points for why someone would want the Lead Magnet and explained what they could expect when they signed up to be an insider.
You can learn how to create a compelling landing page using the resources at the end of this playbook.
Action Item: Create your squeeze page.
Pull Traffic From Your Blog
Chances are you probably have some form of a blog connected to your website. If that’s the case, this step will help improve your rankings, while also improving the chances your leads will convert on your squeeze page.
Your next step is to write a blog post on a topic that closely relates to the content in your lead magnet. Funneling your traffic through your blog, will help build authority as a brand (prospects can read your blog, and know that you know your stuff), and increase the likelihood those readers will convert. All that extra traffic to your blog will also help improve ranking in google.
In that blog post, you’ll want to have a few CTAs for readers to check out the Lead Magnet. We typically put them at the top of the blog…

In that blog post, you’ll want to have a few CTAs for readers to check out the Lead Magnet. We typically put them at the top of the blog…
…Inside the body once or twice (depending on the length of the post) …

…Inside the body once or twice (depending on the length of the post) …
…and once at the end of the post.

…and once at the end of the post.
Doing this makes it easier for your readers to convert without having to scroll around to try and find the link/button.
Now it’s your turn!
ACTION ITEM: Create your own blog post.
Develop Your Ad Deliverables
Now that you have a blog post all set up, it’s time to create some engaging ads to drive traffic to your blog post. You’ll need a few different ads…
- Some ads that point people to your blog post
- Some ads that redirect people who have viewed the blog page to the lead magnet squeeze page
- Some other ads that direct people straight to the squeeze page (if you don’t have a blog)
These Top of Funnel ads should focus on the benefit and be geared towards an audience that would get value out of your product.
You can go back to your Before and After Grid and pull out some information on what your customer’s struggles are, and how your Lead Magnet could help them solve, or get one step closer to fixing their problem.
We recommend you create a few different versions and A/B test them to better your chances of connecting with your target audience.
Don’t forget to incorporate all the ad best practices:
- A clear and compelling CTA]
- Clean visuals (if you have them)
- Trackable links
ACTION ITEM: Create your ad deliverables.
Once that’s finished, you are all ready to set up your funnel!
Start Growing Your List!
Set Everything Live
You now have a complete funnel created to attract new leads and build out your email list. Congrats!
Your final step is to set everything live.
Action Item: Launch your funnel.
- Activate your squeeze page, and connect your ESP to the form
- Post your blog post and link to your squeeze page throughout
- Set your ads live and start tracking your results
Now What?
Once your funnels go live, the leads will start coming, so you must have a plan for how you are going to keep your email list engaged!
You can start with an indoctrination series, then move on to develop a newsletter, or run a campaign.
You can build your own landing page using the Landing Page Builder Playbook.
For building a blog, check out our Blog Content Playbook as well.