Making professional-looking videos doesn’t have to be rocket science. Almost every marketer and business will use video to inform their audience and sell their product at some point. But how do you do it well? In this article, you’ll get simple, applicable strategies and steps you can start using today to take your video from looking like it was produced by a five-year-old to polished and professional.
Amateur’s Guide for How to Create Professional Marketing Videos
What You’ll Learn:
- 5 common mistakes to avoid and 6 videos do’s to create a professional video that will elevate your brand and sell your products
- The 4 elements to create a simple—but effective—video studio that won’t break the bank
- A checklist to audit your video script so you can effectively convey your marketing message
- Steps to record on-location and in a studio
Table of Contents
Table of contents
Understand the Role & Purpose of a Professional Video
Understand the Objective
Review Your Script
Use the Video Script Audit
5 Video Mistakes to AVOID
Avoiding Common Video Mistakes
DON’T Use Distracting Backgrounds
DON’T Have Strange Things In The Subject’s Head Space
DON’T Use Overhead Lighting
DON’T Use Blank Off-White Walls
DON’T Have Bad Audio
6 Video Do’s
A Few Helpful Tips You SHOULD Do
DO Use Your Phone
DO Use 4K (But 1080p is Fine, Too)
DO Stabilize Your Camera
DO Test Your Recording & Playback
DO Keep the Subject’s Gestures in the Frame
DO Reduce Ambient Noise
Set Up Your Studio & Shoot Your Video
A Simple Studio Setup
Studio Element #1: Lighting
Studio Element #2: Lens
Studio Element #3: Composition
Studio Element #4: Camera Angle
Sitting or Standing?
Record On-Location
What’s Next?
Run the Play
Checklist
Understand the Role & Purpose of a Professional Video
Understand the Objective
A good video can skyrocket your digital marketing results.
Just look at companies like Dollar Shave Club, Poo-Pourri, or Chatbooks. These companies all experienced an EXPLOSION in growth as a result of a great video ad.
And here’s the good news:
You, too, can create professional-looking videos.
…videos that SELL…
Even if you’re brand-new to creating videos or you don’t have a studio full of fancy equipment or you’re on a tight budget.
This training will help you do it.
You’re about to learn insider strategies that production companies use to make their videos look and sound professional. These strategies work for 1-minute Facebook video ads, 20-minute video sales letters (VSLs), and everything in between.
And best of all? We’ve made this article as concise and actionable as possible, so you can start implementing these methods within the next hour to create more polished and effective marketing videos.
Ready? Then let’s get started!
Review Your Script
Use the Video Script Audit
Most videos follow a script. Why?
Simple: because people’s attention spans are limited. That’s why, to maximize your video’s effectiveness, you need to get your message across as succinctly and persuasively as possible.
So the first thing you should always do before filming is to review your script to make sure it’s the best it can be.
We know, we know—you’re probably itching to start recording right away. We get it.
But trust us: taking the time to revise your script before you shoot is well worth the effort. It’s the best thing you can do to put your video in a position to succeed.
Here’s the Audit we use to QA our video scripts before we begin shooting. Go through this list and check the items off one-by-one (you can download your own Video Script Audit in the Resources section below):
- Read your script out loud
- Ask yourself: is it conversational? You should write as you talk. Use lots of short, punchy sentences. Like this. And sentence fragments. Use those, too.
- Ask yourself: do you use any complicated words and/or confusing phrasing? To find this out, the trick is to read your script out loud at 2x speed. Pay attention to any places where you get tripped up or tangled up in the words. Those are the parts you need to rewrite and simplify.
- Use evocative language that creates vivid mental images
- We like to use something called the “Eyes Shut Test.” Read the script to someone while their eyes are closed. Afterward, ask them what images came into their head. If they didn’t have any images—or if they had the wrong images—that’s a sign you need to use more evocative language (i.e., specific nouns and action verbs).
- Get rid of weak words
- Cut down on adverbs and adjectives. These are generally weak words that don’t pack much punch. Instead, focus on specific nouns and strong action verbs.
- Eliminate clichés and “ad speak,” and replace tired phrases with a fresher, more unique language. In the ad below, Bold City could have said: “An English Ale so good it’ll knock your socks off.” But instead, they twisted the cliché into something clever:
An English Ale is so good it’ll knock your socks off.
- Deploy surprise, pattern-interrupts, and attention resets
- Anytime it seems like your video script is getting dull, insert something to shake things up—a pause, or a camera angle change, or a question. Something unexpected to grab hold of the viewer’s attention and keep them watching.
- Replace generalities with specifics
- Generalities are easily forgotten, but specifics are memorable. Look at these two sentences:
- “Our product saves people about $100 a month.”
- “Our product saves people an average of $108.35 a month.”
- See how much more memorable and credible the second version is?
- Generalities are easily forgotten, but specifics are memorable. Look at these two sentences:
- Use rhyme and meter whenever possible
- Have you ever noticed that many successful infomercials almost sound like a song? That’s because they employ meter and rhyme. Rhyming language actually passes by the critical parts of our brain (Broca’s area), making it more believable and memorable. Don’t overdo this technique to the point where it sounds like you’re reading a Dr. Seuss book… but a little bit of musicality in your script can help it to make a lasting impression on your viewers.

Bottom line: take the time to get your script right. It’s one of the most important steps in creating an effective video that sells.
ACTION ITEM: Download the Video Script Audit from the Resources section below and use it to review and edit your script before you start filming. Fix any weak areas in your script.
In the next module, we’ll talk about some of the no-no’s that’ll keep your video from being polished and professional.
5 Video Mistakes to AVOID
Avoiding Common Video Mistakes
In the following lessons we’ll cover the most common issues you’ll see with many online videos. Making one of these mistakes doesn’t necessarily doom your video to failure…
…but that said, you still want to avoid them because they can:
- Give your video an amateurish feel
- Distract your viewer from the message you’re trying to get across
Now here’s the good news:
By simply steering clear of these common missteps, you’ll be separating yourself from thousands of competing videos out there and representing your brand in a more polished and professional manner.
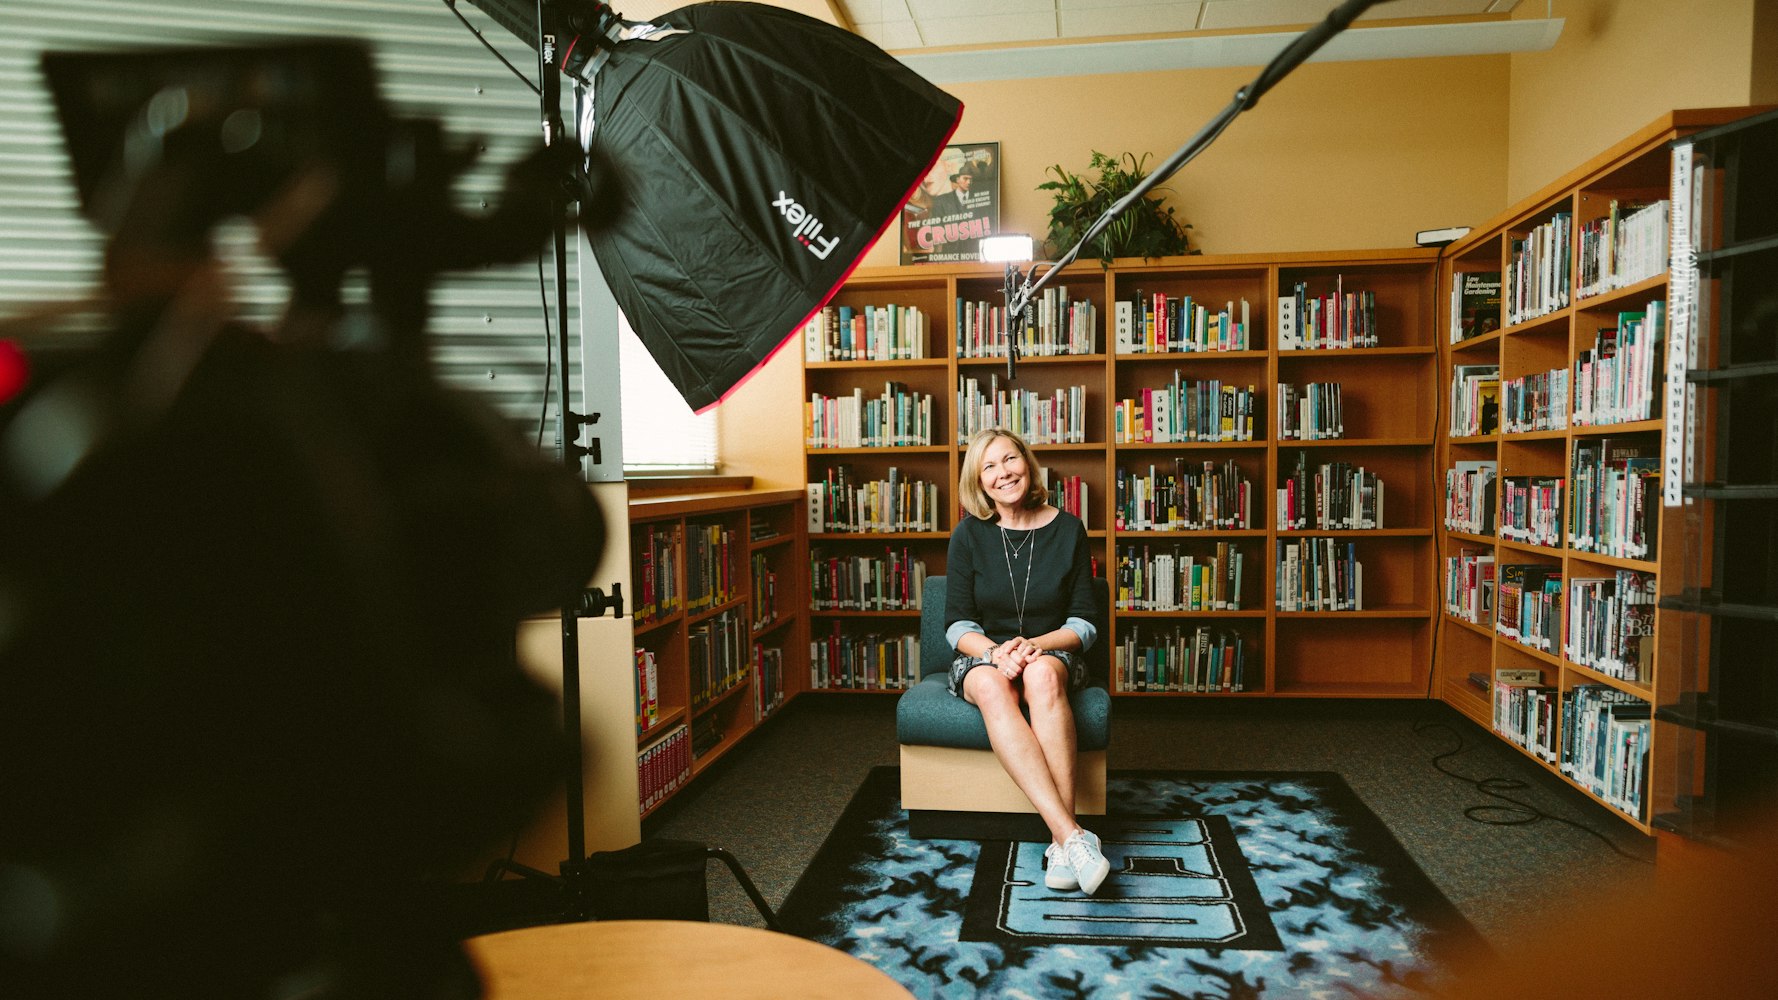
DON’T Use Distracting Backgrounds
In a marketing video, you want the viewer’s attention to be on you and your message.
Not the wall behind you, the weird-looking ceiling in your office, the garbage lying in the corner, or the people in the background.
You.
Indeed, news channels will often feature a distracting background—like these examples in which a kid steals the focus away from the news anchor:

Indeed, news channels will often feature a distracting background—like these examples in which a kid steals the focus away from the news anchor
But keep in mind: the goal of a news station is NOT to persuade, it’s to entertain. They don’t really care if you listen to the anchor or not, as long as you don’t change the channel.
Remember that YOUR goal is to persuade. And to do that most effectively, it’s important to minimize all distractions as much as possible.
DON’T Have Strange Things In The Subject’s Head Space
Be cognizant of the background in your video—especially the area around your subject’s head.
It can be very distracting if your subject has, for instance, a gear or an outlet growing out of their ear, as demonstrates here:
Remember, the viewer will be watching the subject’s face. So keep that area clear to minimize distractions.
DON’T Use Overhead Lighting
We’ll talk more about lighting soon. But for now, be aware that overhead lighting is NOT a good look for video subjects.
It causes a little condition we like to call “Raccoon Eyes”:

It causes a little condition we like to call “Raccoon Eyes”
Stay tuned to learn how to set up a simple lighting solution that will make your subject look great in a non-raccoon way.
DON’T Use Blank Off-White Walls
Let’s be clear:
A pure white background is a good thing.
White is clean. It’s clear. It’s professional.
But off-white, on the other hand, can range from “blah” to “gross.”

But off-white, on the other hand, can range from “blah” to “gross.”
A subset of this mistake includes whiteboards.
Whiteboards are actually tricky to light without creating a bunch of glare. We recommend skipping the whiteboard and using a paper easel instead.

We recommend skipping the whiteboard and using a paper easel instead.
Another option is to use a monitor or screen like we often do for our training…

Another option is to use a monitor or screen like we often do for our training…
Both options create little to no glare and look professional.
DON’T Have Bad Audio
Audio trumps video.
There, we said it.
When people shoot videos, many tend to pay too much attention to the video and not as much to the sound. But this is a mistake.
People will forgive bad videos. If your shot is a little blurry, or if something is a little hard to see, it’s usually not a big deal.
But nobody will put up with bad audio. If your voice is quiet, echoey, or hard to understand, most of your viewers will leave immediately.
So with that in mind, make sure to get a great mic setup BEFORE buying a camera. Audio should be your #1 priority.
It will be money well-spent.
6 Video Do’s
A Few Helpful Tips You SHOULD Do
We’ve gone through the DON’Ts, so now let’s talk about a few things you should do when creating marketing videos. We’ll cover that in the following lessons…
DO Use Your Phone
One of the most common barriers that prevent people from getting started with video is the belief that they need a $10,000 camera to make anything that looks halfway decent.
Nothing could be further from the truth!
Unless you’re still rocking the same flip phone you used to make your MySpace profile picture, there’s a good chance you can make great-looking videos with your phone.
If you’re a beginner, you probably SHOULD use your phone. Here are a few of the reasons why:
- You don’t have to spend any extra money right away
- It’s an easy, simple tool for beginners
- Most phones shoot in HD, which is all you really need
On the flip side, buying a separate camera can slow you down, it costs more money, and it can make the video production process unnecessarily complicated (especially when you’re just getting started and figuring things out).
DO Use 4K (But 1080p is Fine, Too)
If you don’t know what the numbers 4K, 1080p, or 720p mean, they’re basically a measurement of resolution.
720p is considered “HD” and 1080p is considered “full HD.” 4K is double the resolution of 1080p (2160p).
Most phones that are 2-3 years old have the ability to shoot in all three of these resolutions, so you don’t need to go out and invest in a $3000 camera.
While shooting in 4K is not necessary, we highly recommend shooting in 4K even if you are just going to upload the video in a 1080p or 720p resolution. This will give you the best resolution and shooting parameters possible and when you render the video to a lower resolution it will still look great!
DO Stabilize Your Camera
No matter what kind of camera you use, you definitely want it to hold still while you’re shooting. Nothing says “amateur video” more than an unintentional Blair Witch Project effect.
Fortunately, this is easy to do. Just get a tripod. They’re cheap, easy to use, and will keep your camera steady when shooting.
DO Test Your Recording & Playback
Before you start recording your video, take a minute to test everything out.
Take it from us—this is a good idea.
Just shoot a quick video and then play it back to make sure everything looks and sounds good. The idea is to test that your video is sharp, that your audio is recording through the right source, that the volume is high enough to be audible, and so on.
This way you won’t waste your time reading your whole script only to realize you didn’t actually get a usable recording.
DO Keep the Subject’s Gestures in the Frame
One principle to be aware of is that you never want to “break” the frame.
In other words, you never want your subject’s head or arms to get cut off. When you break the frame, it can throw the viewer out of their experience (that’s a bad thing).
If your speaker is very animated, you might need to pull back the camera a little to give them some room to move around.
DO Reduce Ambient Noise
Up until now, we’ve talked about a lot of potential visual distractions. But you also need to be on the lookout for audio distractions.
Birds chirping… people talking… lawnmowers right outside the window…
Even a loud breeze can be extremely distracting in a video (you can get a windscreen for your mic to help with this).
Depending on the video editing equipment you use, you can get rid of distracting sounds. But save yourself some time and effort by shooting in a quiet place whenever possible.
Set Up Your Studio & Shoot Your Video
A Simple Studio Setup
Now that we’ve covered some of the basics, let’s get started on your studio.
What’s that, you say? My studio?
Yep. Your new video studio.
A studio just means you’re filming in front of a backdrop.
It doesn’t have to be anything fancy.
Unless you have a reason to be shooting your video on-location, setting up a simple studio is a really good idea.
Here’s why:
First of all, shooting in a studio tends to look more professional.
Second, shooting in a studio is easier than shooting on-location.
And finally, a studio will eliminate unnecessary information in the frame—putting the viewer’s focus entirely on the messenger and the message, which is exactly what you want if you’re trying to create persuasive videos that sell.
Here’s what our studio looks like:
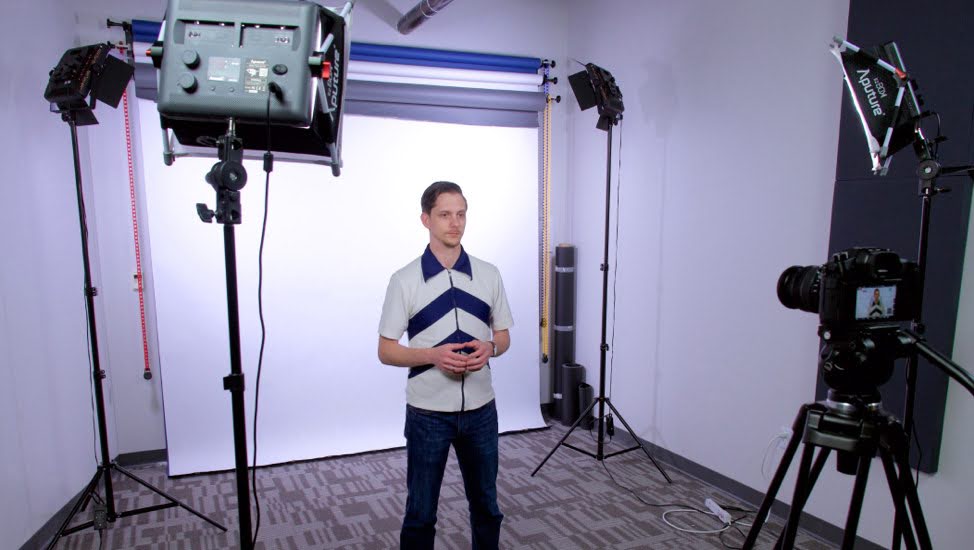
Setting up a simple studio is a really good idea.
Does that look really fancy and impressive?
It’s actually a lot simpler than it looks. All you really need is:
- A backdrop. You can get these on Amazon; they’re not expensive. For the longest time, we only used white backdrops. Today we also have blue and gray (we don’t recommend trying to use a green screen. They can look really amateurish if you don’t know what you’re doing.)
- A few lights. For this setup, you need 4
- A camera mounted on a tripod
- A microphone
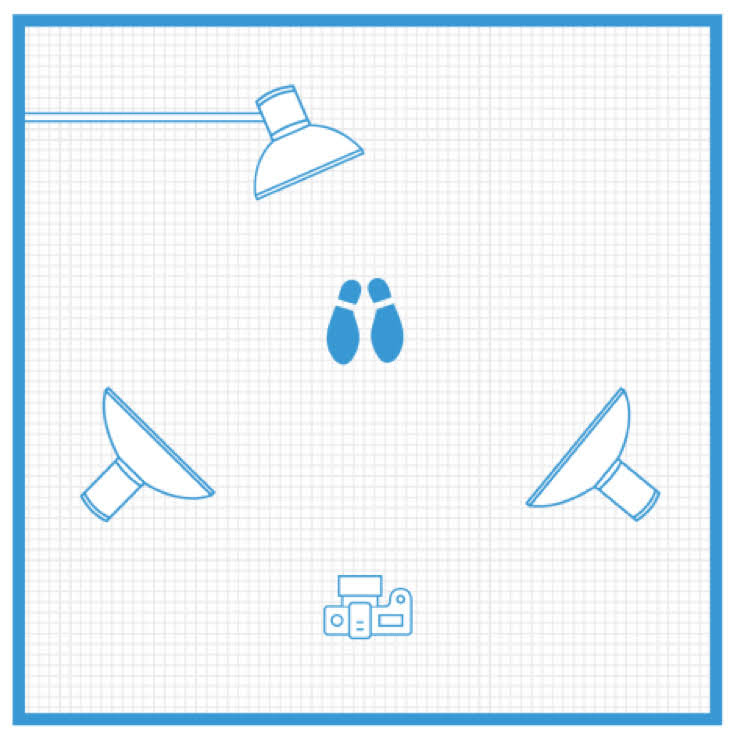
Here’s how the setup looks from above:

Simple studio setup looks from above
There are 4 major elements of any video studio:
- Lighting
- Lens
- Composition
- Camera Angle
We’ll cover them next.
Studio Element #1: Lighting
When you’re creating videos, lighting is important and frequently underrated. Bad lighting can absolutely ruin a shot (remember the “raccoon eyes” earlier in this article?).
Good lighting can sometimes be really tricky to achieve.
The good news is that because your studio is a controlled environment, your lighting setup will be simple, easy, and effective. You need 4 lights. Two of them are on the subject, and 2 are on the backdrop.
A lot of people forget that last part. They light the subject, but not the backdrop.
Lighting the backdrop helps you eliminate shadows and show more visual separation between the subject and the backdrop—which helps to keep the focus of the video on the speaker.
Now if you’re shooting on-location, this lighting setup may not work (we’ll discuss that later in this module). But as long as you’re in your studio, this should be all you need to get great-looking, professional videos.
ACTION ITEM: In your video studio, get 4 lights: 2 to light the subject, 2 to light the backdrop.
Studio Element #2: Lens
Different cameras have different lens lengths. If you have a DSLR, for example, you can swap out your lenses to change the depth of field in your shot.
Here are a few different lenses to give you an idea:
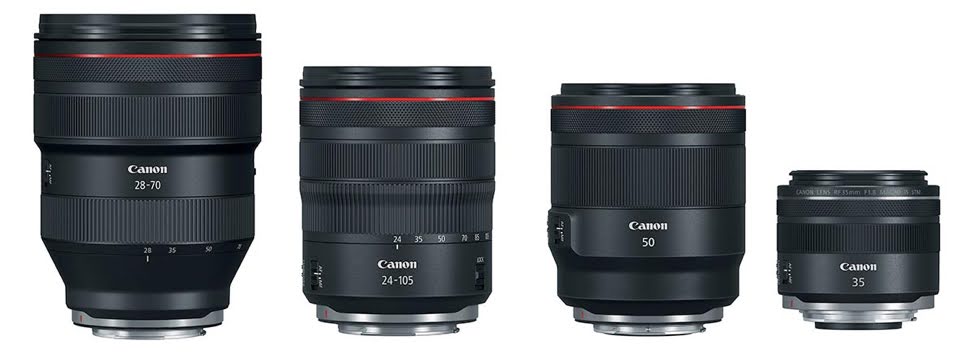
A few different lenses to give you an idea
Practically speaking, you don’t need to know much about the depth of field. The main thing to keep in mind is that if you want a more professional video, you want more depth of field because it will show more distance between the subject and the backdrop.
This way, the subject will be in focus and the background will be out-of-focus—blurred out—which keeps the viewer’s attention focused on the speaker.
Here’s an example of what that looks like:

Here’s an example of what that looks like.
You can achieve the depth of field in 2 ways:
- Use a camera with a longer lens
- Have the subject stand farther away from the backdrop
Simple enough? We think so. smile
ACTION ITEM: Use depth of field to create a more interesting, professional-looking shot.
Studio Element #3: Composition
Let’s talk about composition. In other words: how do you place the elements in your shot to get the effect you want? And more specifically, how do you frame the subject?
The first thing you need to know is the “Rule of Thirds,” which separates the frame of your video into 9 boxes—think of a tic-tac-toe board:

The first thing you need to know is the “Rule of Thirds,” which separates the frame of your video into 9 boxes—think of a tic-tac-toe board.
Here are some things to keep in mind:
For the most part, you do NOT want to put your subject dead center in the frame for long periods of time.
The center of the frame is a show of power and dominance and can be off-putting if you do it too much. A good rule of thumb would be to avoid the center of the frame unless you’re making a call to action (CTA).
Instead, you usually want your subject to be a little bit off to the side. We recommend the top-right.
Here’s why:
First of all, we like the right-hand side because that’s where your viewer’s gaze stops. People who read left-to-right (like we do in English) tend to let their gaze drift in that direction.
So we recommend keeping your subject on the right-hand side. And anytime you want to add something to the shot—like an image or text—do so on the left-hand side. That way the viewer will look at the new object, and then drift back to your speaker.
Make sense?
We also like to use the top of the frame because it’s a position of power, which is important when your goal is persuasion.
You rarely want your subject to be in the lower third of the frame. (At least, not for a sales or marketing video.) Instead, use that area for displaying people’s names and so forth.
Remember, your goal here is to bring the viewer’s focus toward the subject.
ACTION ITEM: Film your video with the subject in the top-right of the frame. Use dead center when you deliver your CTA.
Studio Element #4: Camera Angle
Finally, let’s look at some of the different camera angles you can use to capture your subject. Broadly speaking, we categorize most shots as either:
- Straight on (the camera is eye-to-eye with the subject)
- Subject superior (the camera is below the subject)
- Subject inferior (the camera is above the subject)
So which do you want to use?
In general, you want the camera to be more or less eye-to-eye. You can make the camera a little bit superior or inferior if you want, but you don’t want the effect to be too dramatic or it will work against you.
Here’s a quick explanation of the subject superior and subject inferior angles, how they work, and when you might want to use them.
Subject Superior Angle
In this shot, the camera is slightly below the subject and looking up:

Subject Superior Angle
This is used to show power and authority. It makes the viewer feel like they are literally looking up to the speaker.
This angle tends to work well for persuasive videos, where you want your speaker to appear credible and respectable.
Just don’t overdo it. Taken too far, a subject superior angle will make you look like a jerk, obviously not an effective way to inform or persuade your audience:

Taken too far, a subject superior angle will make you look like a jerk, obviously not an effective way to inform or persuade your audience.
Subject Inferior Angle
This is the opposite of “Subject Superior,” and as you probably guessed, it has the exact opposite effect. It gives the viewer the impression of looking down on the speaker:

Subject Inferior Angle
A lot of people use this angle when they take selfies, to hide that whole double-chin thing. But generally speaking, this is NOT the effect you want for a persuasive video.
If you like, you can make strategic use of this angle once in a while to show intimacy and humility—which can help forge a bond between the viewer and the subject.
Once again, don’t take it too far, because then you’ll look TOO inferior:

Once again, don’t take it too far, because then you’ll look TOO inferior.
From this angle, Kevin looks small, almost like a kid. Definitely not persuasive.
ACTION ITEM: Based on the video you’re shooting, consider and select the camera angle(s) you will use.
Sitting or Standing?
We’ve almost covered all the important questions when it comes to framing your subject in a way that lends visual strength and draws the viewer’s eye.
Lastly, let’s talk about some of the pros and cons of having your subject sitting or standing in the video.
Sitting
Having your subject sit down lends an informal, chatty kind of vibe to your video:

Having your subject sit down lends an informal, chatty kind of vibe to your video.
It can work well if you’re teaching or informing. But it’s bad posturing for sales, so we don’t recommend sitting down when you’re actually selling in your video.
Sitting on a Stool
Another option that’s kind of partway between sitting and standing is to use an elevated posture, such as sitting on a stool.
When you use this in combination with a subject superior shot, it can give the viewer the feeling of sitting at your feet—which, again, is great for teaching:

When you use this in combination with a subject superior shot, it can give the viewer the feeling of sitting at your feet.
Standing
Standing is for leading. Standing is the most active, dynamic, and powerful posture you can take.

Standing is for leading. Standing is the most active, dynamic, and powerful posture you can take.
Anytime you’re selling on video, stand up!
ACTION ITEM: Based on the video you’re shooting, decide if your subject will deliver the message sitting or standing.
Record On-Location
Up until now, we’ve focused mostly on how to record in a studio environment.
But sometimes, you may want—or have to—to record a video on-location. Maybe you’re shooting interviews at a live event, or maybe you think that a certain background will help give your video the right mood or atmosphere.
The first thing to be aware of is that you should always be intentional with your background.
Take this example. Would you buy financial services from this guy?

The first thing to be aware of is that you should always be intentional with your background.
No? Yeah, us either.
What about marriage advice?
Still no?
OK, how about a travel package for college kids on spring break?
Ah, now we’re talking.
The point we’re making here is that there’s no such thing as a “bad” location for your video… just a location that says the wrong thing at the wrong time.
ACTION ITEM: Think about the message you want to convey with your video and choose an on-location background that reflects that.
On-Location Camera Setup
When you’re shooting on-location, the big difference is that you won’t be using a backdrop. Instead, the background will usually be farther away and contain more (potentially) distracting elements—like trees, buildings, cars, even people.
As a result, your light and camera setup will have to change.
Rather than using 4 lights, as you did in your studio, instead, you’ll want to use a classic 3-point lighting setup.
Here’s what it looks like from above:
Rather than using 4 lights, as you did in your studio, instead, you’ll want to use a classic 3-point lighting setup.
Once again, there is no backdrop to light. Instead, you should use the third light behind the subject.
This backlight provides more visual separation. Basically, it helps your subject look crisp and stand out from the background (rather than blending in with it).
Otherwise, the lighting principles are the same. You still want 2 lights on your subject from the front (keep in mind, you may need to vary the intensity of your lights depending on how well lit the location is).
You may also want to change your depth of field to get that “blurry” effect in your background—especially if the background itself is busy or potentially distracting.
Remember, you need 2 things to achieve this blurry background:
- A decent camera with a good (long) lens
- Distance between the subject and the background
This allows you to have an interesting background without it being too distracting, and while maintaining the focus on your subject.
Here’s an example of our on-location camera setup in action:

Here’s an example of our on-location camera setup in action.
Now that you understand the setup, it should seem pretty simple and easy to achieve yourself.
What’s Next?
In this training, we’ve talked about the most important details to consider when creating your video. But there’s 1 final piece of advice we want to leave you with:
Keep it simple.
There’s a tendency among some video creators to try to make their videos more and more complex, with lots of different angles and shots and other cool effects.
Remember, though, that the simple (often called “ugly”) sales video structure usually outperforms high-production videos.
Why is that the case? Persuasion expert Robert Cialdini explains it this way:
“Even though cut-heavy TV commercials draw more total attention, they produce significantly less memory for the ad’s persuasive claims and significantly less persuasion… For everyone concerned, it’s a case of death by a thousand cuts.” – Robert Cialdini
FINAL ACTION ITEM: Avoid making too many camera angle cuts and overcomplicating your video, which will cause your message to get lost. Instead…
- Write a solid script (use our audit to make sure your message is clear)
- Build your studio
- Make audio your #1 priority
- Frame and light your subject in a way that puts the focus on the speaker and their message
- Record your video
And with that, you have everything you need to create a studio and start shooting professional-level videos that will elevate your brand and sell your products.
Run the Play
Just remember when it comes to producing your own marketing videos, it’s important to plan, build, and launch your video with the “3 Cs” as your north star. You want to focus on confidence, clarity, and conciseness so your message does not get lost in the noise. Remember that you have 3 – 5 seconds to reel in your audience, so don’t let too much “glitz and glamour” destroy the message of your marketing videos.
For this “Run the Play” section, we are going to focus on three separate phases: Plan, Build, and Launch. While the Build section of this checklist will take a majority of your time (and some consider the most fun) it’s important to understand that the Plan and Launch section of this checklist will be CRUCIAL to your marketing video’s success.
Checklist
Plan
KNOW THE GOAL: Before you even begin to worry about scripts, shooting, post-production, or launching your video. What is your video trying to do? Sell a product, get a prospect to a landing page, subscribe to your newsletter, etc? Also what type of marketing video are you trying to produce? A VSL, Testimonial, Product Demonstration, Advertisement, etc? The key is making sure you are 100% clear on your marketing video goals before you do anything else.
SCRIPT: After you know your goal, the next step is to start writing your script. You do not need to be Aaron Sorkin when creating your script, however, you do want to take one important trait from his writing style –– you want to be CONVERSATIONAL. Write as you talk! You don’t need to do anything fancy, you don’t need to sound like an authority, you just need to sound like your talking to someone you know. Make sure your messaging is concise (3c!) you don’t want to lose your audience over convoluted messaging. Remember you want to capture the attention of your audience in the first 3 to 5 seconds.
REVIEW YOUR SCRIPT: After you are satisfied with your script, have someone else review it. You want someone that will NOT be afraid to give you HONEST feedback. We are not talking about a copyeditor, we are simply talking about having a third party read through your script. Have them check to see if the script is clear and concise. Is it conversational? Does it give enough specifics without being overtly informative? Does the language sound like everyday vernacular? If you are unsure or any question marks come up, go back and fix those aspects of your script.
SETUP YOUR SET: You do not need a Hollywood backlot to have a professional set –– much less a big blockbuster budget. The key to your set is simplicity. You want to make it as simple as possible because you don’t want to distract your audience from the message you are trying to get across.
Build
TECHNICAL SETUP: For your pre-shoot, you want to do a quick technical run-through of all your equipment. Make sure you have good lighting, the camera is at eye level, and you test sounds. (NOTE: If you are recording on your phone and it has 4K recording ability, record in 4K even if you aren’t going to make the video 4K. This ensures you get the highest quality video possible for your post-production.) If you are going to invest in one piece of equipment, the best thing to invest in is an external microphone. Camera mics are terrible and will give you muffled audio. We have three tips you need to abide by. Number one, make sure you have good lighting. Even if you don’t have studio lights, simply make sure you are near a window and some natural lighting. Number two, USE a tripod. This is not the Blair Witch Project, a shaky video will cause your audience to become distracted and lose interest quickly. Number three, use blankets on the floor (especially if they are not carpeted) to help with sound. DO NOT let a technical issue with your video cost you the ability to get your message across to your customers.
TEST RUN: Before you start filming get your on-camera talent in the setup and do a few test shots. This will make sure you have the right technical setup and you will be happy with the finalized shoot.
FILMING: Film your video. How you choose to shoot your video is entirely up to you. Here at DM we shoot our videos based upon how our on-camera talent prefers. Sometimes that means we film them in chronological order or sometimes we film out of order, based on what makes our on-camera talent the most relaxed and comfortable.
EDITING: Edit your video while keeping those 3cs in mind (confidence, clarity, and conciseness). Be sure to work in attention resets such as jump angles, bold words, animations, etc. The key here is not to get FPS (fancy play syndrome). Still, keep it simple, but accentuate what you want your audience to hone in on. At this stage (optional) you may want to make a few different cuts of your video for A/B testing purposes.
WRITE YOUR COPY: We find that a lot of amateurs skip this step or forget about it completely. You will most likely be running this video on some type of online advertising platform (Facebook, Instagram, YouTube). You’ll need to make sure the headlines and copy you write for your video are aligned and sync up with the tone you are trying to convey. If your prospect reads a headline but it in no way matches the video you are going to lose interest really quickly.
Launch
UPLOAD: You have produced your video and now it’s time to show the world! Based on your marketing goals upload it to where you want people to see it. If it’s an ad you need to upload it directly to the ad platform (i.e. Facebook Ads) if it’s a YouTube video make sure you insert your keywords into the video for SEO purposes. Also if you want the video to land on your site upload it to your video hosting sites, such as Wistia or Vimeo.
ANALYTICS: Be sure to keep up with the analytics that your company has deemed important for marketing videos. Are you just looking for views, impressions, or entire watch-throughs? Also, pay attention to conversions. Maybe your video is not getting the conversions the way you thought it would –– it might be time to record a new video. If you have multiple versions and decided to A/B test your ads with your audience, go through and review your findings.